
Monday, February 27, 2012
Quick Clementine Muffins
Hello all!
I know you are all so surprised to hear from me! But this is a quick post to share with you one of my favorite treats ever...
the muffin.

Because, no matter how many exams or papers I may have, I always have time for muffins. Like Jim Gaffigan said, "they're like muffin vitamins" and are important to maintaining my, erm, sanity to say the least.
So, clementine muffins. Simple, quick, delicious, and wonderfully reminiscent of the warmer weather I and my Northeast friends have been teased with these past few weeks. Will the warm weather stay? Probably not. Will these muffins stick around for long?

Sunday, February 19, 2012
Short Hiatus
Hello fellow lovers of food,
It is a sad, sad time here at Rutgers...
midterms.
Would it be more fun to bake cookies and cake? Of course. But the demands of finance (as well as literary theory) beckon to me with a demanding finger, and I must answer.
But this is not so much of a hiatus as it is a "I will be posting less often because I am super busy"-iatus, so hopefully for you (and for me!) I will return to Sugar Mountain soon to post more sweet treats.
As always, happy baking!
~Jess
Friday, February 17, 2012
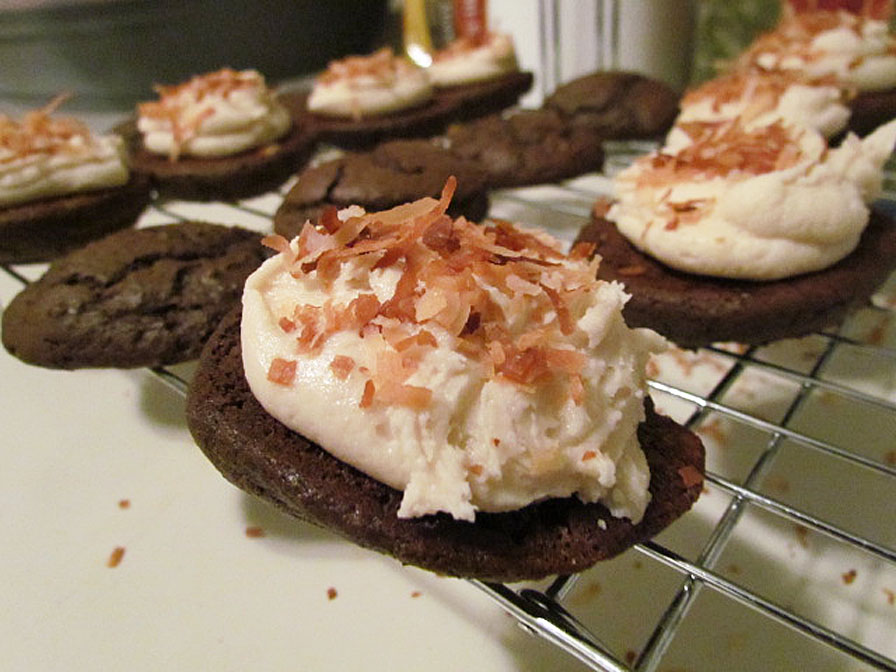
Samoa Whoopie Pies
Hello all,
Today I bring you another whoopie pie, but I must tell you, these are not like any other whoopie pie you may have tried before...

This is your favorite Girl Scout Cookie reborn into a decadent, moist, delicious dessert that is still easily portable and extremely addictive.
That's right: Samoas. My absolute favorite cookie ever. The only issue I have with them (which I think you will all agree is a legitimate one) is that they don't put anywhere near enough cookies in one of those boxes. Let's be serious here Girl Scouts: I want to eat more than the meagre sixteen you put so delicately into one box. Okay, I know sixteen doesn't sound meagre, but leave that box in a kitchen with family members or roommates and you will realize that it is indeed never enough.
Now I know it's because they're delicate little cookies, and that it's really just the way the Girl Scouts get us to buy oh, say, a dozen boxes of each type of cookie, but I can't take it anymore. I need instant Samoa gratification and I need it now.
So, I found this stellar recipe on SweetLittleDetails and had to test it out for myself. How hard could it be?


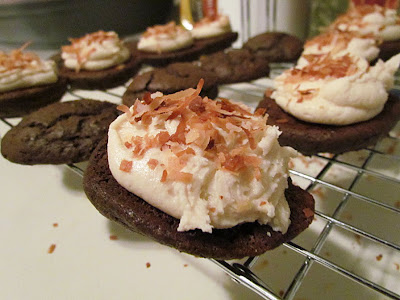

Well, they're not so much difficult as they are a laborious. It's a many stepped process, but every step is needed to achieve chocolatey, caramel, coconut perfection.
Sigh. My life is complete.


Still want more? Check back next week for my final post on these sweet little sandwiches with Carrot Cake Whoopie Pies!
Samoa Whoopie Pies Via SweetLittleDetails
Today I bring you another whoopie pie, but I must tell you, these are not like any other whoopie pie you may have tried before...

This is your favorite Girl Scout Cookie reborn into a decadent, moist, delicious dessert that is still easily portable and extremely addictive.
That's right: Samoas. My absolute favorite cookie ever. The only issue I have with them (which I think you will all agree is a legitimate one) is that they don't put anywhere near enough cookies in one of those boxes. Let's be serious here Girl Scouts: I want to eat more than the meagre sixteen you put so delicately into one box. Okay, I know sixteen doesn't sound meagre, but leave that box in a kitchen with family members or roommates and you will realize that it is indeed never enough.
Now I know it's because they're delicate little cookies, and that it's really just the way the Girl Scouts get us to buy oh, say, a dozen boxes of each type of cookie, but I can't take it anymore. I need instant Samoa gratification and I need it now.
So, I found this stellar recipe on SweetLittleDetails and had to test it out for myself. How hard could it be?


Well, they're not so much difficult as they are a laborious. It's a many stepped process, but every step is needed to achieve chocolatey, caramel, coconut perfection.
Sigh. My life is complete.


Still want more? Check back next week for my final post on these sweet little sandwiches with Carrot Cake Whoopie Pies!
Samoa Whoopie Pies Via SweetLittleDetails
1 2/3 cups flour
2/3 cup cocoa powder
1 1/2 tsp baking soda
1/2 tsp salt
1/4 cup softened butter
1/4 cup shortening
1 cup brown sugar, firmly packed
1 egg
1 tsp vanilla
1 cup milk
1 cup toasted coconut
1 cup chocolate chips, melted
1 cup chocolate chips, melted
1. Preheat oven to 350 degrees and line two cookie sheets with parchment paper.
2. Whisk together flour, baking soda, cocoa powder, and salt in a medium bowl. In a separate, larger bowl beat butter, shortening and sugar for a good 5 minutes or until well incorporated. Beat in egg and vanilla.
3. Beat in flour mixture and milk in two additions (1/2 flour + 1/2 cup milk, repeat) until well incorporated.
4. Measure out tablespoonfuls of batter onto cookie sheet, leaving plenty of space between for spreading. Bake at 350 degrees for about 10 minutes or until whoopie pies spring back lightly when touched. Let cool 5 minutes on pan before moving to cool entirely on wire rack.
Toasting Coconut: Spread coconut out onto rimmed baking sheet and bake at 350 degrees for about 10 minutes, stirring often to prevent burning.
Chocolate Drizzle: Melt chocolate chips in microwave safe bowl on 30 second intervals until completely melted.
Caramel Buttercream
1/2 cup butter, softened
1/4 tsp salt
1/4 cup + 2 tbsp brown sugar
1 tsp vanilla extract
1/4 cup caramel syrup
1 tbsp + 2 tsp milk
3 cups powdered sugar
1/4 tsp salt
1/4 cup + 2 tbsp brown sugar
1 tsp vanilla extract
1/4 cup caramel syrup
1 tbsp + 2 tsp milk
3 cups powdered sugar
1. Beat butter and brown sugar, then beat in salt, vanilla, caramel syrup, and milk.
2. Slowly beat in powdered sugar.
2. Slowly beat in powdered sugar.
Assembling Whoopie Pies:
Match up cookies according to size and pipe buttercream onto one cookie. Sprinkle toasted coconut on top of buttercream and then drizzle with chocolate. Place other cookie on top, pressing gently to secure.
Tuesday, February 14, 2012
Pink Velvet Whoopie Pies
Happy Valentine's Day!
I am sure there are just about a ton of pink/red-themed dessert posts floating around by now, but is that really such a bad idea? I, for one, can always use more pink in my life.
Which is why it was slightly disappointing when my supposedly pink velvet whoopie pies turned from bright pink to, well...


Maybe I meant Peach Velvet?
I often go to "paint your own pottery" with my mom and they always say to make the color deeper than you want it because once it's baked (you were wondering where the relevance was weren't you?) it comes out much lighter.
Case and Point: whoopie pies that resemble my skin tone after I am out in the sun too long. Ugh.


So are they pretty in pink? No. I was a bit overdue for a less than beautiful baked good, especially after the adorable lemon blueberry cheesecake cookies and the super cute strawberry muffins.
But they ARE delicious, and for Valentine's Day it's the thought that counts. When I bring these over to my boyfriend tonight he will enjoy them regardless of the color, because I made them especially for him.
Plus they also gave me the chance to use my beautiful new baby blue cake stand (seriously, go get yourself a dozen; they're under $3 at Christmas Tree Shop in a slew of Spring colors).


I've included the recipe below from KokoCooks (whose whoopie pies are indeed pink) and so my only advice to you when you approach these - make sure you have a deep pink/red color before you bake. It will absolutely positively lighten by the time you take them out to cool.
Happy Valentine's Day and Happy Baking!
Pink Velvet Whoopie Pies Via KokoCooks
2 1/4 cups flour
1 tsp baking soda
1/4 tsp salt
1 cup sugar
1 egg
1/3 cup vegetable oil
1 tsp vanilla
red food coloring (as needed - at least 10 drops)
3/4 cup buttermilk
1. Preheat oven to 350 and line two cookie sheets with parchment paper.
2. Whisk together flour, baking soda, and salt in a medium bowl. In a separate, larger bowl, whisk together sugar, egg, and oil until well combined. Whisk in vanilla and food coloring.
3. Fold in flour mixture and buttermilk in alternating batches, starting and ending with flour.
4. Scoop batter out with mini ice cream scoop and place (at least 2 inches apart) on cookie sheet.
5. Bake at 350 for 10-15 minutes or until a whoopie pie springs back lightly when touched.
6. Let cool 5 minutes on pan before transferring to wire cooling rack.
7. Match whoopie pie halves together according to size. Place large dollop of Marshmallow Filling in center of one half and place other cookie on top, pushing down slightly to spread filling.
Marshmallow Filling
1/2 cup butter, softened
1 cup powdered sugar
1 cup marshmallow fluff
1/2 tsp vanilla
splash of heavy cream (or milk)
1. Combine all ingredients and beat until smooth.
Monday, February 13, 2012
Strawberries 'n Cream Muffins
Hello all,
I wasn't going to post again until Valentine's Day but I whipped these up this past Friday and they came out so wonderfully that I couldn't not share it with you all (please ignore the English major using double negatives).
I pinned a recipe for Strawberry Mug Cake awhile back and I had the urge to test it out, and my roommate offered to pick the strawberries up for me while she stopped at Costco. Why I didn't realize that this would be entirely too many strawberries is beyond me, but now I was stuck with them.
So what do I do with the extra strawberries? Turn them into muffins of course!

Did that really surprise anyone? Other than the fact that the post has the word muffin in the name, probably not. I believe we've established I have a bit of muffin mania. It's quite alright, genius is often mistaken for madness.

I am also proud to say that these are entirely my own creation, which makes me even more excited to share it with you. The use of heavy cream gives the muffins a nice touch of sweetness along with a crumbly texture that is melt in your mouth yummy. The addition of white chocolate chips sure didn't hurt either.

These are great just as an any-day indulgence but with Valentine's Day swiftly approaching, I thought this would be great to share as a quick fix for a sweet gift for someone special.
In case your more in the Whoopie Pie mood for the holiday, check back Tuesday for Pink Velvet Whoopie Pies!
Happy Baking!

Strawberries 'n Cream Muffins Via Yours Truly
2 cups flour
1/2 cup sugar
1/4 cup vegetable oil
1 heaping cup chopped strawberries
1 egg
1 1/4 cup heavy cream
1 tbsp baking powder
1/4 tsp salt
3/4 cup white chocolate chips
1. Preheat oven to 350 degrees and line/grease one 12-cup muffin pan.
2. Sift together flour, sugar, baking powder, and salt in a large bowl.
3. In a separate bowl, whisk together oil, egg and cream.
4. Add wet ingredients to dry ingredients and stir until just combined. Fold in strawberries and white chocolate chips.
5. Fill each cavity of the pan 3/4 of the way full with batter and bake at 350 for 20-25 minutes or until a toothpick comes out clean.
Thursday, February 9, 2012
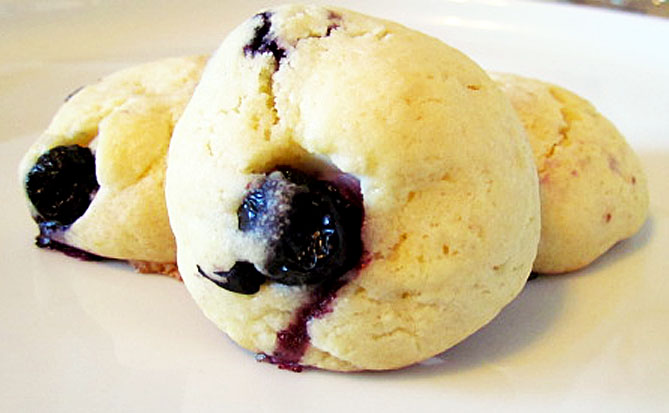
Lemon Blueberry Cheesecake Cookies
Friends,
I almost thought I wasn't going to be able to share these with you today.
I saw a dreaded red battery symbol on my camera after taking photos of the Lemon Streusel Muffins. Now normally one would say "Jess that is silly just go and charge your battery."
About that...see in order to charge a battery, one needs a charger. Naturally I went to go and look for mine and wouldn't you know it, I left it in Florida. Cue disappointing music.
So what was I to do? Well, apparently if you leave your camera alone for a few days it will retain just enough juice to take some photos of these killer cheesecake cookies.


Phew! Crisis Averted. For a minute there I thought I would have to take photos with my phone.
On a more serious note, this whole stuffed cookie idea is wonderful; why didn't anyone think of this earlier?
As I ask that I can think of one semi-legitimate reason: they are sort-of a pain in the butt. Whether you plan on trying out these or even the Nutella Stuffed Sugar Cookies, do yourself a favor and make sure you don't have to rush. These cookies are delicious and a bit on the decadent side, and as such need the tender loving care of a patient baker.


I am not a patient baker.
But, even with my frantic running around in my tiny kitchen, I managed to pull these off. I do not however, understand how HotPolkaDot managed to not burst any of the blueberries. Seriously. It's impossible.
Bursted berries or no, these will be sure to please. Fresh blueberries and lemon zest with a pillowy cream cheese center, what's not to love?

Lemon Blueberry Cheesecake Cookies Slightly Adapted from HotPolkaDot
3 cups flour
1/2 tsp baking soda
1/2 tsp baking powder
1 tsp salt
1 cup butter, at room temp
1 cup sugar
2 eggs
3 tbsp lemon juice
zest from 1 lemon
1 cup blueberries
4 oz cream cheese, cut into 1 tsp pieces
1. Preheat oven to 350 degrees and line cookie sheets with parchment paper.
2. Sift together flour, baking powder, baking soda, and salt.
3. In a separate bowl, cream together butter and sugar until light and fluffy. Beat in eggs and lemon zest, being sure to scrape any zest off of the mixer. Beat in lemon juice until well incorporated.
4. Add flour mixture and stir until dough comes together. Gently fold in blueberries. Place dough in fridge to set up (about 20 minutes).
5. Roll tablespoonfuls of dough into balls. Then, make imprint in center and place 1 tsp of cream cheese in center. Roll dough over cream cheese and back into the shape of a ball.
6. Place on prepared cookie sheet and bake at 350 for 10-14 minutes or until edges are slightly browned.
7. Cool on wire rack and then eat up!
I almost thought I wasn't going to be able to share these with you today.
I saw a dreaded red battery symbol on my camera after taking photos of the Lemon Streusel Muffins. Now normally one would say "Jess that is silly just go and charge your battery."
About that...see in order to charge a battery, one needs a charger. Naturally I went to go and look for mine and wouldn't you know it, I left it in Florida. Cue disappointing music.
So what was I to do? Well, apparently if you leave your camera alone for a few days it will retain just enough juice to take some photos of these killer cheesecake cookies.

Phew! Crisis Averted. For a minute there I thought I would have to take photos with my phone.
On a more serious note, this whole stuffed cookie idea is wonderful; why didn't anyone think of this earlier?
As I ask that I can think of one semi-legitimate reason: they are sort-of a pain in the butt. Whether you plan on trying out these or even the Nutella Stuffed Sugar Cookies, do yourself a favor and make sure you don't have to rush. These cookies are delicious and a bit on the decadent side, and as such need the tender loving care of a patient baker.


I am not a patient baker.
But, even with my frantic running around in my tiny kitchen, I managed to pull these off. I do not however, understand how HotPolkaDot managed to not burst any of the blueberries. Seriously. It's impossible.
Bursted berries or no, these will be sure to please. Fresh blueberries and lemon zest with a pillowy cream cheese center, what's not to love?

As always, I hope you try these out for yourself and share with friends; nothing brings a smile to someone's face better than a fresh, sweet cookie. That is, unless it's a dozen of said cookie. :)
Next week will be full of my other favorite cookies: Whoopie Pies! So be sure to hop back on over to Sugar Mountain!
Lemon Blueberry Cheesecake Cookies Slightly Adapted from HotPolkaDot
3 cups flour
1/2 tsp baking soda
1/2 tsp baking powder
1 tsp salt
1 cup butter, at room temp
1 cup sugar
2 eggs
3 tbsp lemon juice
zest from 1 lemon
1 cup blueberries
4 oz cream cheese, cut into 1 tsp pieces
1. Preheat oven to 350 degrees and line cookie sheets with parchment paper.
2. Sift together flour, baking powder, baking soda, and salt.
3. In a separate bowl, cream together butter and sugar until light and fluffy. Beat in eggs and lemon zest, being sure to scrape any zest off of the mixer. Beat in lemon juice until well incorporated.
4. Add flour mixture and stir until dough comes together. Gently fold in blueberries. Place dough in fridge to set up (about 20 minutes).
5. Roll tablespoonfuls of dough into balls. Then, make imprint in center and place 1 tsp of cream cheese in center. Roll dough over cream cheese and back into the shape of a ball.
6. Place on prepared cookie sheet and bake at 350 for 10-14 minutes or until edges are slightly browned.
7. Cool on wire rack and then eat up!
Tuesday, February 7, 2012
Lemon Streusel Coffee Cake Muffins
Hello all!
So I learned something while preparing for this post:
working with lemons in baking is tricky.

Case and point: this recipe I am sharing with you is the third attempt at lemon muffins in the past three days. Dedicated? Yes. Obsessed? Maybe just a little. But I just couldn't get it right until today.


For starters, however, when a recipe tells you to take 2 whole lemons, slice them in quarters, place in the blender, and then use that mixture in the muffins just stop and say no. This is a muffin PSA from me to you: don't do it. There's no way this will work out well, and do not succumb (like I did) and think that since it's a recipe on a decent-looking food blog, they will turn out great. In reality, it will be like chewing on a giant piece of lemon with bits of muffin on it.
But, after all the lemony labors of love, I have these little sweeties to show for it:


Lemony sweet and fun to eat! The coffee cake has just the slightest hint of lemon that gets amplified by the lemon glaze that catches to every inch of the crumbly struesel topping.
So, seeing as how I now have breakfast for the week, I can say it was all worth it. Not to mention during all of this the kitchen smelled lemony fresh! I hope you enjoy baking these up for yourself, knowing that it is both tested and approved by your truly.

Lemon Baking continues with the next post OnSugarMountain for Lemon Blueberry Cheesecake Cookies!
Happy Baking!
Lemon Streusel Coffee Cake Muffins Via SimplyScratch
2 cups flour
1 tsp salt
1 tsp baking powder
1 tsp baking soda
1/2 cup butter at room temp.
1 cup sugar
1 tbsp lemon zest
2 eggs
1 tsp vanilla extract
1 cup buttermilk (or 1 tbsp white vinegar + enough milk to make 1 cup)
For the Topping:
1 3/4 cup flour
3/4 cup brown sugar
3/4 cup butter, cubed
1 tsp salt
Lemon Glaze
1 cup powdered sugar
3 tbsp lemon juice
**Preheat oven to 350 and grease one 12-cup muffin pan OR one 6-cup jumbo muffin pan**
1. To make the topping: mix together the flour, brown sugar, and salt. Cut butter into flour mixture with pastry cutter (or two knives) until mixture resembles coarse crumbs. Keep in fridge while whipping up everything else.
2. For the muffins: Whisk together the flour, salt, baking powder, and baking soda in a medium bowl. In a large bowl, beat sugar and butter together until creamy. Add lemon zest and beat in each egg, one at a time, until fully incorporated. Mix in the vanilla.
3. Alternately fold in the flour mixture and the buttermilk, starting and ending with the flour.
4. Fill each muffin cup in pan 3/4 full. Sprinkle topping over muffin batter.
5. Bake at 350 for 20-25 minutes for standard sized muffins or 40-45 minutes for jumbo muffins. Let cool completely before removing from pan.
Friday, February 3, 2012
Liebster Blog Award
Friends,
I have exciting news...

I won an award!
It's called the Liebster Blog Award, and it's given to bloggers with less than 200 followers and means "dearest" or "favorite" in German. How awesome is that? It means so much that, even with my 22 followers (whom I love and appreciate each and every moment I see you all on my Dashboard), I am still making my way into the food blogopshere and can be considered for such an award.
I want to thank BakerBecky at thebakerbecky.blogspot.com for giving me this and nominating me as one of her 5 favorite blogs. It really means alot Becky, and I hope you all go check out her site as well with all it's delicious recipes.
1. Thank the person who awarded you on your blog
Congrats my fellow up and coming bloggers!
Thanks again Becky and I hope to see you all back OnSugarMountain on Monday for a peek at some delicious lemon muffins.
Happy Baking!
I have exciting news...

I won an award!
It's called the Liebster Blog Award, and it's given to bloggers with less than 200 followers and means "dearest" or "favorite" in German. How awesome is that? It means so much that, even with my 22 followers (whom I love and appreciate each and every moment I see you all on my Dashboard), I am still making my way into the food blogopshere and can be considered for such an award.
I want to thank BakerBecky at thebakerbecky.blogspot.com for giving me this and nominating me as one of her 5 favorite blogs. It really means alot Becky, and I hope you all go check out her site as well with all it's delicious recipes.
Now, this is an award that is a pay-it-forward type, which is the best type if you ask me; it really highlights the community aspect of blogging that I have come to love so much. So, in order to accept the award (which I totally do!) you have to do the following:
1. Thank the person who awarded you on your blog
2. Share the link to to the person who awarded you
3. Select your 5 Top Picks for the Liebster Award
4. Let them know by leaving a comment on their blog
4. Let them know by leaving a comment on their blog
5. Post the Award on your blog (this seems a given - who wouldn't want to post about an award?)
So, without further ado, here are my 5 Blog Choices for the Liebster Award:
1. Cucina49
3. BakerBettie
Thanks again Becky and I hope to see you all back OnSugarMountain on Monday for a peek at some delicious lemon muffins.
Happy Baking!
Thursday, February 2, 2012
Nutella Stuffed Sugar Cookies
....Are you ready?
For what you might ask?
For the amazing idea that is...Nutella Stuffed Sugar Cookies (major applause)

Yes, apparently you can now stuff your sugar cookies with wonderful fillings, such as Nutella. Mind blowing right? It was for me anyway.
After the overwhleming success with the Nutella Brownies earlier in the week, I just knew these would be a smash hit.
Now you might be saying "wouldn't stuffing a sugar cookie with ooey, gooey, yummy Nutella be difficult?"
Not at all! Well, maybe, but you need to push through it because your tummy (and any nearby friends) will be thanking you for the rest of your life.


So first semi-tedious process: scooping out teaspoonfuls of Nutella onto a baking sheet. This ensures that the filling is a good size in ratio with the amount of cookie dough, but man is Nutella stubborn. It took me quite awhile (and many expletives later) to get all 20 little dollops onto the sheet, but I did it, and into the freezer they went.
So now we move from tedious to just plain frantic. Well, if you're me it was frantic; maybe if you are more coordinated than I am this will be a breeze. You need to split the cookie dough ball in half, flatten one side, and quickly place the dollop of frozen Nutella in the center and cover with the remaining half of dough before the Nutella melts. Hint: do NOT touch the Nutella with your fingers whatsoever: a spatula and a spoon will save you the issue I soon encountered with the Nutella melting by the mere poke of an index finger.


But, after all this, if you choose to continue, you wind up with these:


Worth. Every. Second.

I also had the thought that if this works with Nutella, why stop there? I mean, I don't care for peanut butter but I am sure that a chocolate cookie stuffed with peanut butter (maybe even jelly too!) would go over quite well with oh, say, everyone?
Everyone that likes peanut butter anyway. But regardless, this is a whole new way to look at (and enjoy) cookies, and I hope you decide to try it out for yourself.
Next time On Sugar Mountain will be Lemon Muffins. Simple yet satisfying.
As always, Happy Baking!
Nutella Stuffed Sugar Cookies Via CookinCanuck
2 1/2 cups flour
1/2 tsp baking powder
1/2 tsp salt
1 3/4 sticks butter
1 1/2 cups sugar + 1/3 cup sugar, divided
2 tsp vanilla
2 eggs
1/2 cup Nutella
1. Preheat oven to 350 and line 3 cookie sheets with parchment paper
2. Scoop out 1 teaspoon-sized dollops of Nutella onto one of the cookie sheets (you need about 20-24). Place cookie sheet in freezer for 15 minutes.
3. In a medium bowl whisk together flour, baking powder, and salt.
4. In a separate larger bowl, beat together butter and 1 1/2 cups sugar until light and fluffy; then beat in each egg followed by the vanilla extract.
5. Add the flour mixture to the egg mixture and stir/mix until well combined.
6. Roll 2 tbsp of cookie dough into a ball. (I suggest rolling all your cookie dough before pulling the Nutella out of the freezer).
7. Split dough in half and place (using a spatula) a dollop of Nutella in the center. Cover with other half of dough and roll back into a ball, pinching the seams closed. Roll in 1/3 cup remaining sugar and place on baking sheet. Repeat with all.
8. Bake at 350 for 10-13 minutes or until edges are just beginning to brown. Rotate pan halfway through baking to ensure even heating. Cookies will still look puffy in the center because of the filling.
9. Let cool on sheet for 10 minutes before transferring to cooling rack.
Makes 20-24 cookies
Subscribe to:
Posts (Atom)