Showing posts with label red velvet. Show all posts

Wednesday, May 23, 2012

Red Velvet Muffins

Hello all!

I know it's been almost a week since I last posted but I have been busily preparing for a VACATION! Now I know what you're thinking: "Isn't she already on summer vacation?" Technically, yes, but this is a vacation I have been looking forward to for years since the last time I traveled. I get to journey with my boyfriend and his family up to Maine for Memorial Day weekend...

and oh, did I mention we are staying on an island off the coast of Maine? My boyfriend's family has owned a home on Great Diamond Island for generations, where the homes have names instead of numbers (which is awesome in and of itself). Beautiful, quiet, serene: this is my kind of island. Not to mention I fell in love with the city of Portland last time I visited there; great food, cute shops, movies for $5...and of course the best lobster around.

The only negative is that his grandparents' home (which is where we are staying) does not have internet access, so I will be posting all of the lovely vacation photos once I return after Memorial Day. With that said, let me share with you one of my newest creations in my quest for baking fame. Hopefully these will hold you over until I return.

I give you....


The Red Velvet Muffin

Now I'm sure I am not the first one to think up a red-velvet-inspired muffin, but I have to say I am pretty darn impressed with how these came out. Bits of white chocolate midst a perfect scarlet hue, and a cake-like texture with just a slight hint of cocoa flavor; I am lovin' these muffins. True, I love almost all muffins, but there is just something purely wonderful about seeing your own idea transform into a successful sweet treat.


I hope these inspire you to create one of your own decadently delicious muffins, or to just test these out to share with friends. These are definitely the way to go if a full slice of red velvet cake seems over-the-top.

Well, I am off to the lovely coast of Maine; enjoy your Memorial Day and I will be back before you know it!

Happy Baking!


Red Velvet Muffins Via Yours Truly

2 cups flour
1/2 cup sugar
1/4 cup vegetable oil
1/2 cup buttermilk
1 egg
1 tsp vinegar
2/3 cup white chocolate chips
2 heaping tbsp cocoa powder
1/2 tsp baking soda
1 tsp baking powder

1. Preheat oven to 350 degrees and grease one 12 cup muffin pan with cooing spray
2. Combine flour, sugar, cocoa powder, baking powder, baking soda, and white chocolate chips in a medium bowl.
3. In a separate bowl, beat together egg, oil, buttermilk and vinegar. Quickly pour wet ingredient mixture into dry ingredient mixture and stir with large wooden spoon until just combined. Do not overmix.
4. Fill muffin cups 2/3 way full with batter and bake at 350 for 18-20 minutes or until toothpick comes out clean.
5. Let cool 5 minutes in pan before removing to wire rack to cool completely.
3. In a separate bowl

Monday, May 7, 2012

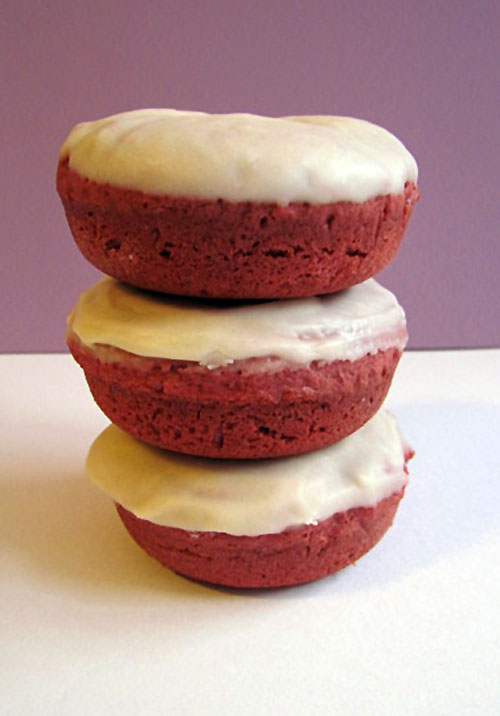
Red Velvet Cake Donuts

Hello friends!

I am finally back in the kitchen whipping up sweet treats to share with you. It took so much self-control to stay off my leg when I had some serious cravings last week, but now I plan to satisfy all of those cravings in the next few posts.

First, a few thoughts on my month of cupcakes challenge. I have learned that, quite honestly, doing an entire month of one type of baked good is not my thing. I am pretty much cupcake-d out...Forever. Or at least for a few weeks.

So with that in mind, naturally the craving I had for red velvet cake was not going to happen if it came out of my kitchen. One week later though, I found myself in the kitchen baking up red velvet...


donuts.


You really didn't think it was going to be another cupcake, did you?

Oh how I love donuts, especially the baked kind which leave me less guilty than their (in my opinion) more delicious yet more terrible for you fried counterparts. Trust me, I'd go for a Krispy Kreme over a baked-cake donut if given the chance, but I can eat more of these delectable donuts without feeling quite so bad about eating them.


These came out absolutely wonderful and right on par with the red velvet flavor I was craving so badly. Think of these as red velvet cake on-the-go! Add some fresh vanilla frosting and you are set.

Happy Baking!

Red Velvet Cake Donuts slightly adapted from Taste&Tell

2 1/4 cups flour
1 tsp baking soda
1 tbsp baking powder
1/2 tsp salt
1 egg
3/4 cup sugar
2 tbsp melted butter
3-4 tbsp semisweet chocolate chips, melted
1/2 cup buttermilk
red food coloring

1. Preheat oven to 350 degrees and grease donut pan(s) with cooking spray. Sift together flour, baking soda, baking powder, and salt in a medium bowl.
2. In a separate bowl, beat together egg and sugar until light and smooth.
3. Beat in melted butter and chocolate chips, then slowly beat in buttermilk.
4. Gradually add flour mixture to egg mixture, stirring until just combined.
5. Fill donut pan cavities 2/3 full with batter (will be very thick, piping it in might be easiest) and bake at 350 for 11-13 minutes or until they spring back lightly when touched.

Vanilla Frosting:

1/4 cup (1/2 stick) melted butter, cooled slightly
1 1/3 cups powdered sugar
1 tsp vanilla
1-3 tbsp warm water

1. Add butter and vanilla to medium bowl. Gradually whisk in powdered sugar.
2. Use tablespoonfuls of warm water to achieve desired consistency.
3. Dip donuts in frosting, then pick up, allowing excess to drip off. Cover with sprinkles or smooth out with spatula.

Thursday, August 25, 2011

Red Velvet Brownies

Ah, what a relief to be all moved in! Now I finally get to share with you the last sweet I whipped up before leaving for college.....

Red Velvet Brownies!

Yes, I know what you're thinking 'I didn't know Red Velvet Brownies even existed...' and neither did I. Until Now.

May I say, that if anyone reading this stumbled upon this post in search of a red velvet cake recipe, look no further. I know these are brownies but trust me, these have all the red velvet flavor and texture without the work of cake. Oh, and did I mention no need for certain ingredients that are not always on hand in everyone's kitchen? (I'm looking at you buttermilk and vinegar.)


1. I found the idea of making a paste with red food coloring, cocoa powder and vanilla extract a really intriguing way to make sure the flavor and color were evenly distributed in the batter. She did call for 2 oz of food coloring and I only had about 1 1/2, but it seemed to work just as well. Plus, food coloring is so expensive, if you can use less, spend less, and achieve the same effect, why not?


2. Creaming butter and sugar with eggs and vanilla is quick and easy; then you add your "red velvet" paste and some flour and...


Voila! Red Velvet Brownie Batter. Just scrape into any square-ish greased pan and bake for 25-30 minutes, and you will be in red velvet heaven.


This is a fabulous recipe for anyone interested in red velvet cake but perhaps does not need an entire cake of it sitting around in the house, only to end up being eaten late at night by the baker herself on a hunt for a sweet bite to eat. You can cut these brownies as little (or as huge) as you'd like, and the cream cheese frosting drizzle is delicious without being overly heavy or overpowering.


I found this recipe by SmellsLikeHome on FoodGawker and just knew I had to try it. Though I did take some liberties in the frosting. White chocolate buttercream does sound amazing, but with no white-chocolate on hand I whipped up a quick cream cheese frosting to drizzle over the brownies instead. No one complained about the switch (who would though, white chocolate or cream cheese frosting - neither a bad choice!).


Hope you enjoy this new take on Red Velvet! And just a heads up, the Sweet Escape will of course still be occurring every Monday, but until I stock up my apartment pantry with baking supplies, there may be a delay in posts with recipes. I apologize and promise I will be back to baking in the kitchen in no time! 

Red Velvet Brownies with Cream Cheese Frosting Drizzle
slightly adapted from Smells Like Home

3 tbsp cocoa powder
2 oz red food coloring (I got away with about 1 1/2 oz)
2 tsp vanilla extract
1/2 cup butter, softened
1 1/2 cups sugar
2 eggs, room temp.
1 1/4 cups all-purpose flour
1/4 tsp salt

1. Preheat your oven to 350 degrees F. Grease a 8x8 or 11x7 baking pan (whichever pan you have handy)
2. In a small bowl, gently mix together the cocoa powder with 1 tsp vanilla extract and red food coloring. It should end up as a thick, smooth paste with no lumps.
3. In a separate bowl, cream butter and sugar until light and fluffy (about 2 min). Beat in eggs, one at a time, then mix in 1 tsp vanilla. Turn mixer off and add the cocoa powder/food coloring paste to the mixture and beat on medium speed until well incorporated.
4. Slowly add in flour and beat until just combined and no clumps remain.
5. Spread batter into prepared pan and bake at 350 degrees for 25-30 minutes or until toothpick comes out clean. Let cool completely in pan on wire rack before icing or slicing :)

Cream Cheese Frosting 

2 oz cream cheese, room temp.
1/4 cup butter, softened
1/4 tsp vanilla
1 2/3 cup powdered sugar
splash of milk (as needed)

1. Cream together cream cheese and butter. Add vanilla.
2. Slowly add powdered sugar and beat until well incorporated. Add splash of milk if needed to adjust consistency.
3. Scrape frosting into Ziploc bag and snip off small corner. Pipe/drizzle frosting over cooled brownies.


Friday, July 15, 2011

Red Velvet Cake Pops

Hello all! I apologize; I know I said to check back the following day for photos and an update on the "Cake Pop Conundrum" but I ended up spending over three hours in the kitchen with these! For all good reasons though, don't worry. The question of "to dip, or not to dip" is solved my friends: to dip. Definitely dip.

I decided to use Bakerella's Red Velvet Cake Recipe for these cake pops, since this is my all time favorite red velvet recipe. It is actually the recipe that brought me to the realization that red velvet is one of (if not the) best cake out there, after carrot cake anyway. Naturally I forgot to buy any buttermilk, but I found this nifty substitution in the Cake Pop Maker Manual that says to mix 1 1/2 tsp of vinegar with 1/2 cup milk and voila: buttermilk.


Warning: making bite-sized red velvet cakes is dangerous. If you are like me, and have little to no self control when it comes to cake, I urge you to think wisely (but not too wisely, I mean they ARE uber yummy) when it comes to whipping up these little beauties. 


There were a few...mishaps, when getting these out of the cake pop maker (when isn't there a mishap in my kitchen?) but I decided to crumble these into a topping for the other pops. I will make one suggestion if you plan on using the cake pop maker: this is a super moist cake, and perhaps lowering the amount of vegetable oil in the recipe might make the pops easier to remove from the maker. They are just so delicate and delicious - so be gentle! 


I decided to be even more meticulous today with my pops: after dipping the sticks in the candy melts I stuck these puppies back in the freezer for 20 minutes. It made such a difference; I cannot express how much easier this was. But it could have been easier because I used Wilton Candy Melts instead of the ChocolatePro Chocolate, which I find to be way to thick for cake pops. From now on, its candy melts for me and my pops.


Look how cute they are! I'm telling you - candy melts are the way to go. The ones I made the other day with the chocolate had to be put in the fridge for almost 40 minutes to set up. These dried in all of ten minutes on my counter. Wilton has it right with the candy melts, just not with the Chocolate Pro Chocolate. Figures, since the Chocolate Pro Chocolate is a much bigger bag and more economical. It would just be too easy for it to work well with cake pops. 


These are absolutely my favorite type of cake pop. Red Velvet is just so rich; it's so nice to just be able to have a bite (or three!) of it without feeling like you have to make the entire cake and have it tease you on your cake stand until you inhale it all (not that I ever have...). 

So the conundrum is no more - dipping is great - if you use the right coating. But, if you don't want to dip, feel free to enjoy these little cake bites as is. :)

I've included Bakerella's recipe here for you all to enjoy, with slight adaptations for the cake pop maker and the substitute buttermilk. Enjoy!

Red Velvet Cake Pops - slightly adapted from Bakerella

1 1/4 cups flour
1 cup sugar
1 1/2 tsp cocoa
1/2 tsp salt
1/2 tsp baking soda
1 egg
3/4 cup vegetable oil
1/2 cup buttermilk OR 1/2 cup milk with 1 1/2 tsp vinegar added (let substitute sit for 10 min before use)
1 1/2 tsp vinegar
1/2 tsp vanilla
1 oz red food coloring

For coating: 
1/2 bag Wilton White Candy Melts
Red Velvet Cake Crumbs
lollipop sticks

1. Whisk egg and all liquid ingredients together in a medium bowl. Set aside.
2. Whisk together all dry ingredients in large bowl.
3. Whisk wet ingredients into dry ingredients, just until it's well combined with no clumps.
4. Pour roughly 1 tbsp of batter into each cake pop reservoir
5. Cook for 4-5 minutes or until toothpick comes out clean. Carefully remove and let cool.

6. Use any cake balls that fell apart while removing to crumble into topping.
7. Put cake balls in freezer for 10 minutes. Melt Candy Melts
8. Dip lollipop stick in melted coating and put into cake ball. Put cake pops back in freezer for another 15 minutes to harden.
9. Dip cake pops in melted coating and tap gently to remove excess. Dip top of cake pop in cake crumbs and let dry.