Thursday, June 28, 2012

Cappuccino Biscotti

Hello friends!

Twas' a dark and stormy past few days here in Tampa. Tropical Storm Debbie was making a mess of things, and what else is a girl to do with pouring rain and high velocity winds than curl up with a good book, cup of coffee, and a nice, crisp, crunchy Biscotti.


For any of you that have noticed that I avoid said twice-baked cookie, it's because I have had less than stellar encounters with it. A cookie dough so sticky will not leave your hands combined with my colossal fear of burning cookies, the idea of baking until it is dry just somehow leaves me unimpressed.

But the house was dark, the storm clouds a permanenent fixture over my home, and I suddenly felt the need for a cookie I could dip in my coffee while reading a Victorian murder-mystery novel. Yes. I am that nerdy. British Fiction has some amazing murder-mystery novels that are perfect for being stuck inside all day. In case you're curious I recommend Lady Audley's Secret and The Woman in White. You will not be able to put them down; I promise.

Now back to cookies. Start with your dry ingredients:


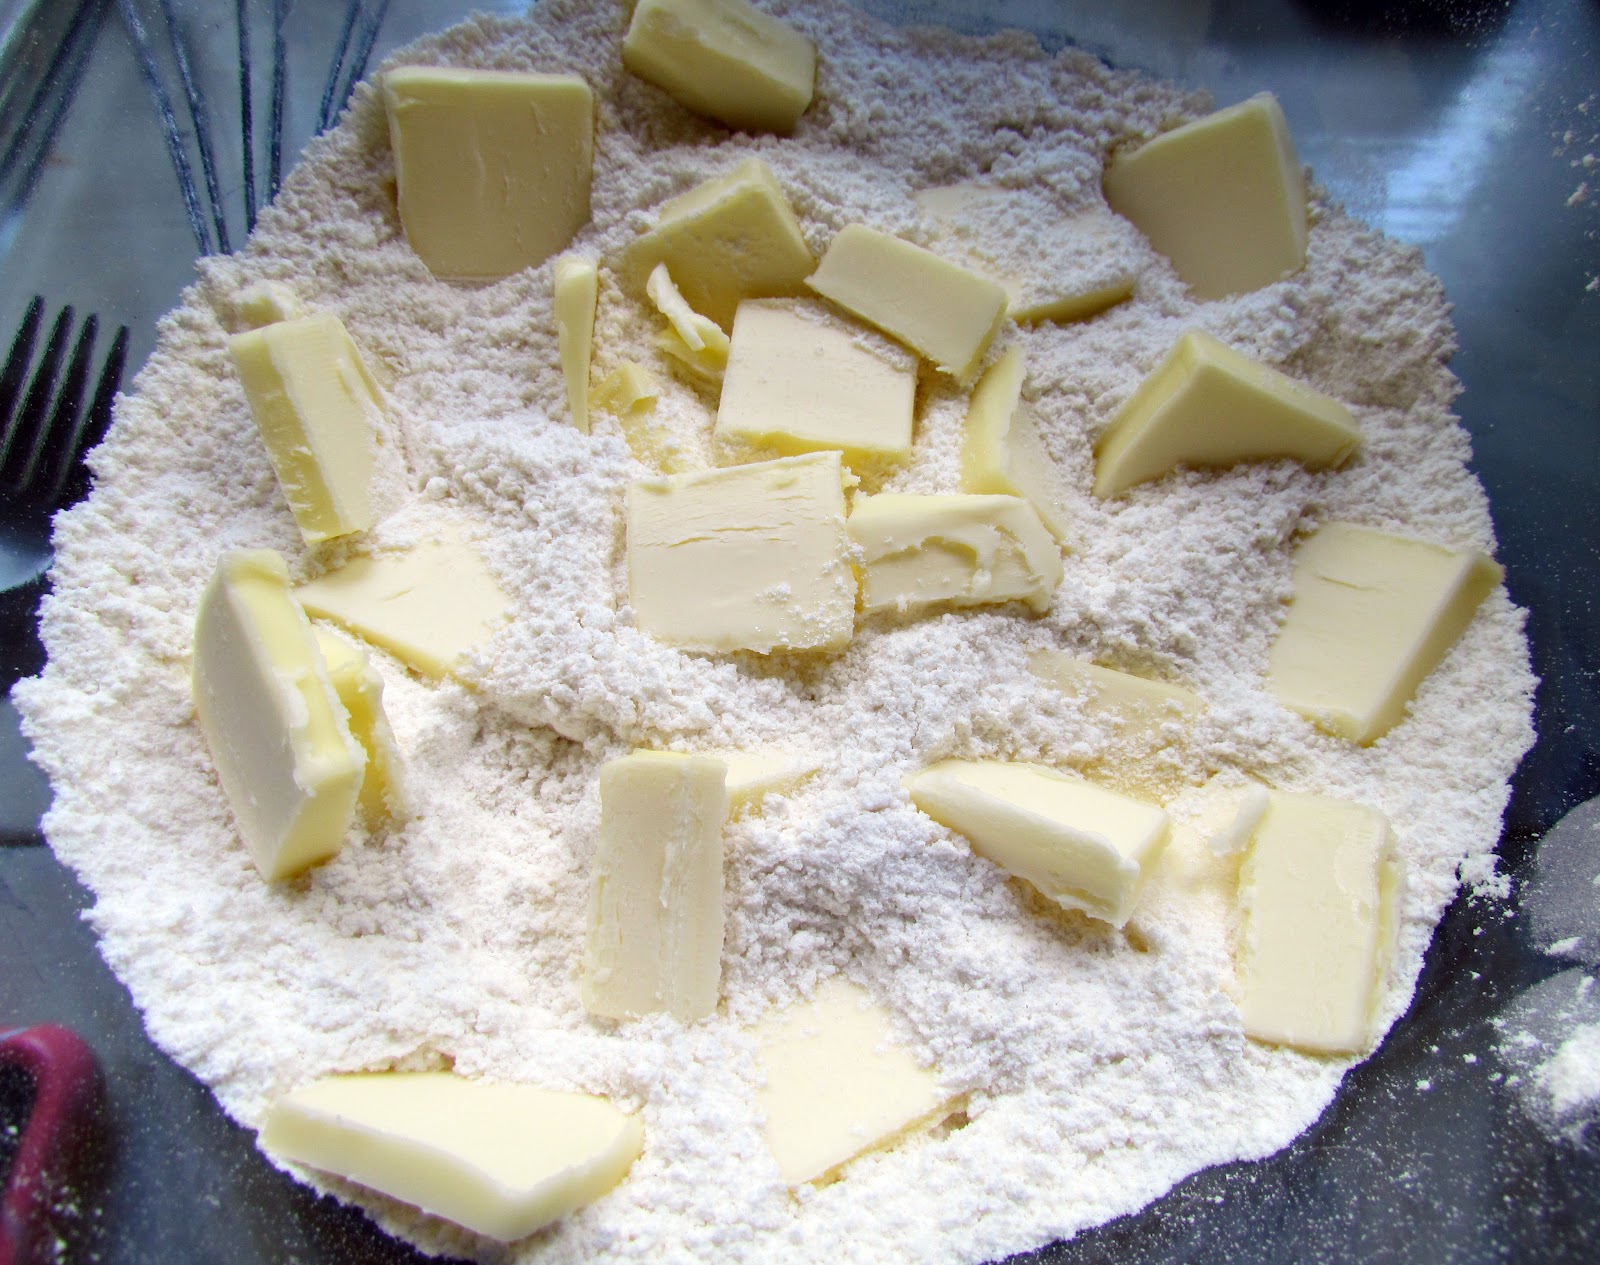
and cut in the cold butter. Mix until the dough resembles coarse crumbs. Now you can do this with a pastry cutter, or two knives, but I personally prefer using a pair of clean washed fingers. Just move quickly so that the heat from your hands doesn't cause the butter to melt.
Next, add the eggs and chocolate chips and mix until the dough is just moistened. It will look a little dry still, but that's okay. Trust me in a moment it will be a sticky mess all over the counter and you will wish it was even close to that crumbly mixture you had a moment ago.

Turn it out onto a lightly floured surface and (with floured hands) knead 8 or 9 times until the dough is uniform. Shape into 2 logs and transfer to a parchment lined, or heavily greased baking pan. If you do not have parchment paper, I suggest putting another baking sheet under the one that is holding the dough, so as to ensure that the bottom doesn't bake too quickly.

Bake for 30 minutes or until the dough seems dry and solid to the touch. Do not turn off the oven; but let the dough cool for 10 minutes or until you can handle it easily without burning yourself. Slice the dough, on the diagonal, and place the cookies, cut side up, back on the cookie sheet. Bake for 7-8 minutes on one side, then flip and bake for an additional 8 minutes.


And we have Biscotti! The result was a little murky there for awhile (much like our weather of late) but I now have some delicious, crispy cookies, full of chocolate chips and a slight hint of coffee to enjoy with my books and a big comfy chair that I do not plan on leaving until I find out who killed whom in my novel.

Happy Baking!

Cappuccino Biscotti Slightly Adapted Via Crumb

2 cups flour
1/2 cup sugar
1/2 cup brown sugar
1 tsp baking powder
1 tsp instant coffee
1/2 tsp cinnamon
1/2 tsp salt
1/4 cup (1/2 stick) cold butter, sliced
1 1/2 cups chocolate chips
3 eggs, lightly beaten

egg wash (1 egg + 2 tbsp milk, lightly beaten together)

1. Preheat oven to 350 degrees and line 2 baking sheets with parchment paper.
2. In a large bowl combine first 7 ingredients. Add in slices of butter and using a pastry cutter or 2 knives, cut in until mixutre resembles coarse crumbs.
3. Add in eggs and chocolate chips and mix until just moistened. Mixture will still look crumbly; that is okay.
4. Turn dough out onto lightly floured surface and knead 8 or 9 times until dough is uniform in texture. It will be very sticky; that is okay. Split dough in half and form into 2 9-inch logs
5. Transfer dough to prepared baking sheets, brush with egg wash, and bake at 350 for 30 minutes or until dough feels firm and dry.
6. Do not turn off oven; let logs cool for 10 minutes or until easy to handle.
7. Slice logs, on the diagonal, into cookies and place back on baking sheets. Bake for 8 minutes on one side, flip, then bake again for an additional 8 minutes or until dry in center. Let cool then store in airtight container.

Monday, June 25, 2012

Classic Crumb Coffee Cake

Hello friends,

I'm at it again with the snack cakes. First Homemade Hostess Cupcakes, now a Crumbly Coffee Cake that knocks the socks off of Hostess' or even Entenman's combined.


After the Hostess Cupcakes, my brother not so discreetly mentioned "dude if you can make me coffee cake I will love you." Little brother, shouldn't it be "I'll love you more?" Hmm I see how this works. Thankfully I make wicked good cakes so I wasn't too worried.


Though you wouldn't have known it from the first attempt I had at making this classic; I had a recipe for Classic Crumb Style Coffee Cake in Peter Reinhardt's Artisan Bread, which I guess was my first mistake. Why would a cake recipe be in my bread book? But I thought why not and painstakingly began the 12+ hours of involvement required in creating bread dough and letting it rise overnight while you fidget impatiently in your bed, imagining how delicious it will be once it's complete.


Friends, delicious it was not.

The crumb topping was just about the only thing that went right with this recipe. I do think that the dough was fine; for something like cinnamon rolls, you know, a bread-like recipe. This is cake darnit and under the crumb topping lay a bland, chewy piece of bread.
Well, back to the cutting board I guess.

So where did I go when my other recipes weren't up to par? I just so happened to pin a NY Style Coffee Cake from Tracey's Cullinary Adventures that featured a sour-cream based cake with a seriously thick crumb topping.


Now that is what I call coffee cake.

I'd like to say I made too much; that we had to give it all away because we got tired of it, but the truth is my friends, we devoured this cake as if it were the last one in the state of Florida. It was that good. And so, I earned my brother's love with a coffee cake that has no rivals, especially not a store-bought one.


Next up on the blog: Hurricane Debbie has come to stay and make a rainy mess of my backyard. What is a girl to do but curl up with a good book, a hot cup of coffee, and a delicious batch of homemade...

You'll have to check back later this week to find out!

Happy Baking!


NY Style Crumb Coffee Cake Via Tracey's Culinary Adventures

for the crumb topping:
1 cup brown sugar, packed
1/2 cup white sugar
1 1/2 tbsp cinnamon
1/2 tsp salt
1 cup melted butter, still warm
2 1/2 cups flour

for the cake:
3/4 cup butter, softened
1 1/2 cups sugar
2 eggs
1 1/4 cups sour cream
1 tsp vanilla
2 1/2 cups flour
3/4 tsp baking powder
1 tsp baking soda
1/2 tsp salt

*Preheat oven to 350 degrees and grease one 9x13 inch pan with butter/cooking spray*

1. Make the crumb topping: Whisk together brown sugar, white sugar, cinnamon, salt, and flour. Pour in melted butter and begin mixing with large spoon. Use finger if necessary to form crumbly texture. Set aside until ready to use.

2. Make the cake: Sift together flour, baking powder, baking soda, and salt in medium bowl. Set aside.

3. In bowl of stand mixer (or large bowl with a hand mixer) beat together butter and sugar until light and fluffy. Add in eggs, one at a time, beating until fully incorporated. Beat for an additional 30 seconds after the last egg.

4. Add sour cream and vanilla and beat until well combined. Slowly fold flour mixture into egg mixture, being careful not to overmix.

5. Pour batter into prepared pan, then cover with crumb topping. Bake at 350 for 45-55 minutes or until a toothpick inserted in the center comes out clean. Let cool in pan at least 30 minutes before cutting and serving.

Wednesday, June 20, 2012

Tarpon Springs Food Truck Rally

Hello all,

This past weekend (besides whipping up awesome Homemade Hostess Cupcakes) I managed to make it to a Food Truck Rally in Tarpon Springs, Florida. First off, might I say this is a fabulous idea and we should encourage more rallies like these in other states? What a great way to get the word out about some really impressive eateries on wheels and yet another excuse for me to stuff my face with good food.


There were about eight or ten trucks all lined up along Tarpon Ave in the historical district of Tarpon Springs, and to top it off we had a lovely sunny day. Though the sunny day quickly turned into a "oh my god it's so hot I'm sweating like a pig" day, it did not deter any of the hundreds of foodies eager to sample the gourmet eats at these food trucks.

From gator empanadas to grouper sliders, gourmet cupcakes to all-natural popsicles, it was like a dream come true for me. My family and I had to walk up and down the street multiple times just to decide where we were going to eat and what we were going to bring back home for later.


My parents decided on the Rollin Zoinks! Truck which featured out-of-this-world wraps, such as The Southerner, filled with fried Chicken, corn, risotto, green beans, and who knows what else. My Dad also settled on the Steak on a Whim, which included steak, of course, along with risotto, mushrooms, green beans and more.

My brother made a beeline for a pulled pork sandwich, and though I originally had decided on the Zoinks! truck as well, my heart was stolen away by the Keepin it Reel Truck. Not that it was really all that difficult to do, since Zoinks! was moving like molasses on their orders, and I sadly have to report that they most likely lost a few hundred dollars in business that way.


I'm not a food truck expert, but I do know that speed is crucial to maintaining your customers, especially when there are seven or eight other trucks within walking distance of you who can dish their meals out in seconds, which was another reason why I hustled over to Keepin it Reel. Fresh seafood sandwiches, including a Sweet Chili Po' Boy that had my name on it, which I ordered, received, and then walked back to my mom at the Zoinks! truck to find her still waiting on her and my dad's food.

The shrimp were fried to perfection, and the heat from the sweet chili sauce paired well with the lettuce, onions, pickles, on a well toasted bun. Not even one bite in, I was approached by five or six people asking what I had ordered and from where, completely intrigued by the steaming sandwich full of bright glistening fried shrimp.

I'd do free advertising for Keepin it Reel if they just paid me in those Shrimp Po' Boys.

Are you curious about the verdict of the Zoinks! wraps?


My parents loved them; every bit was filled with flavor and it was a departure from their normal food comfort zones, but we all couldn't get past the idea of my poor mom, standing there in the unforgiving Florida Sun, waiting for what seemed like hours for two wraps.

Before we left we picked up half a dozen cupcakes from this adorable truck:


which also took longer than expected. I mean c'mon cupcake man, just put them in the box and give me my cupcakes. If there is a truck that is cooking quicker then you are packaging, there's a problem.


But when it came to flavor, there was no problem. We brought them home to have with some coffee, and I had the ingenious idea to cut them into quarters so we could all sample them. I even did my fake Florian impression from Cupcake Wars (which I am so relieved none of you will ever hear). Soft, fluffy, light-as-air cake became the foundation for a subtle lemon with fresh lemon curd center, or a tangy red velvet or even a moist, decadent chocolate cake.
It was a day full of food, which is exactly how every day would be if I could have it my way.
If you're around the Tampa/St. Pete area this summer you have to check out the Food Truck Fridays hosted by TastingTampa. I know we will definitely be going back for seconds, thirds...until they recognize us there and tell us to go home.

Until next time: Happy Eating!
~Jess

Monday, June 18, 2012

Homemade Hostess Cupcakes

Hello friends!

I hope everyone had a lovely Father's Day yesterday; I know we did in my house. While Mom and Dad went to visit the stables to check on my dad's horse, Daisy, I quickly got to work making a Father's Day gift I was sure would bring a smile to his face.

For as long as I can remember, my dad has had a huge soft spot for Hostess Cupcakes. I could make him a million chocolate cupcakes from scratch but none could take the place of those little cakes with the infamous vanilla squiggle...


Until Now.

Thank goodness I discovered you could make these from scratch now that Hostess is facing bankruptcy (again). It does take up a good chunk of your morning I'll give you that, but it is so so worth it.


Worth it how, you may ask? How about for a delectably decadent deep dark chocolate cake, moist and fluffy and filled with ooey, gooey vanilla filling? Oh and covered in a smooth, silky, dark chocolate ganache then finished off with the characteristic vanilla squiggle we've all come to know and love. Between seeing the look of utter  delight on my Dad's face when I presented it to him when he got home, watching him savor every bite, and hearing him tell me it was the best thing I've ever baked, I'd say it was worth it and then some.


And so, my fragile foodie ego is soothed for the moment and I can sit and enjoy one of these little cakes all to myself.
Life is good.
Happy Baking!


Hostess Cupcakes Via 52KitchenAdventures
cupcakes:
1 1/4 cup sugar
1 cup water
4 oz unsweetened chocolate, chopped
1/2 cup buter, sliced
2 eggs
2 tsp vanilla
1 1/4 cup flour
2 tsp baking powder
2 tsp baking soda
1/4 tsp salt
filling:
2 tbsp butter, softened
1/2 cup powdered sugar
1-2 tbsp heavy cream
1 tsp vanilla
2 cups marshmallow fluff

ganache:
1/2 cup heavy cream
1 tbsp butter
6 oz bittersweet chocolate chips
2 tsp vanilla

icing:
1/4 cup butter, softened
1 cup powdered sugar
1-2 tbsp milk
splash vanilla

1. Make the cupcakes: Preheat oven to 350 degrees and line cupcake pans with liners. Place butter and chocolate in medium bowl. Place sugar and water in small saucepan and bring to boil, stirring until sugar dissolves.

2. Remove from heat and pour over chocolate and butter. Let sit, stirring occassionally until butter and chocolate melt and the mixture is no longer hot. While mixture is cooling, sift together flour, baking powder, baking soda, and salt into a medium bowl.

3. Once mixture has cooled somewhat, whisk in eggs and vanilla. Then whisk in dry ingredient mixture. Pour 1/4 cup of batter into muffin cups and bake at 350 for 20-25 minutes until toothpick comes out clean. Let cool while you prepare other parts of the recipe.

4. Make the filling: beat butter until fluffy. Beat in heavy cream and vanilla, then beat in marshmallow fluff. Add additional cream as needed to adjust consistency. Set aside in refrigerator until ready to assemble.
5. Make the ganache: Place bittersweet chocolate in stainless steel or glass bowl. Heat butter and cream in small saucepan until just boiling, then pour over chocolate. Let sit for 5 minutes, then whisk until smooth. Whisk in vanilla. Let sit until cooled but still glossy and smooth.
6. Assemble: Cut small hole in center of cupcake. Spoon filling into center of each, then cover with small piece of cupcake. Using knife or offset spatula, spread thin layer of ganache on top of cupcakes. Place in refrigerator to set up while you make the icing.
7. Make the icing: Beat together all ingredients until uniform consistency is reached. Place in piping bag and pipe squiggle across cupcake.

Friday, June 15, 2012

Strawberry Blondies

Friends,
I write to you in a slightly disappointed frame of mind today. Sadly, this is one of the posts where things did not going according to plan, and I feel like renaming the blog "On Soggy Mountain" or "On Mushy Mountain" as I bow my head in shame.


Sigh. I was so in love with the Twix Brownies earlier this week, I thought I'd attempt a blondie as a nice point of comparison between bar cookies. I also just wanted to eat an entire batch of these Strawberry Blondies from Love&Olive Oil (which I will now not be able to do. Grr.). It started out great; white chocolate, butter, eggs, strawberries, flour, pretty simple, or so I thought. Into the oven it went. Golden brown on the exterior, the knife came out clean, and out of the oven they came....

only to my sad realization that the underneath the enticing exterior lay a mushy, soggy, disappointing interior. Maybe it's a sign that I should ease up on the sweets (hah, right) but soggy or not, I could always use the extra photography practice.

I managed to grab a few decent shots, and I love this one with the new baby cupcake stand. Can you believe it was only $3? Now that's my kind of pricing for food props. It's still taking me awhile to learn all my angles, and I've started this new pinboard on Pinterest with food photography I aspire to/take inspiration from when I am attempting to photgraphy my not so splendid brownies.


I'll include the recipe here with the suggestion that lowering the oven temp to 325 (as opposed to 350) and increasing the cooking time may help you avoid a mushy mess of blondies. I'm off to find a recipe that will soothe (and feed) my fractured ego.

But as always, Happy Baking!


Strawberry Blondies Slightly Adapted Via Love&OliveOil

5 oz white chocolate, chopped
1/3 butter, cut into chunks
2/3 cup sugar
2 eggs
1/4 tsp baking powder
1/4 tsp salt
1 tsp vanilla
1 cup flour
1 cup strawberries, sliced

1. Preheat oven to 325 and line one 8x8 pan with aluminum foil and spray foil with cooking spray.
2. In microwave safe bowl, heat butter and white chocolate in 15 second increments, stirring chocolate and butter in between microwaving until melted. Stir in sugar.
3. Whisk in eggs and vanilla. Stir in flour, salt, and baking powder until just combined, then fold in strawberries.
4. Pour into prepared pan and bake at 325 for 40-45 minutes, or until set and toothpick comes clean out of the center.
5. Let cool completely before slicing into bars to serve.

Tuesday, June 12, 2012

Twix Brownies

Hello friends!

So now that I am back in Florida and pretty much have the whole kitchen to myself, I was almost at a loss as to what to bake for you all for this week's post. Thankfully, Jamie over at MyBakingAddiction came to my rescue in the form of these Twix Brownies. After seeing this recipe (and inadvertently drooling over my laptop) I checked on my Recipe Index to see how many brownies I had listed there. It's quite a sad showing. Yes the Cookie Dough Topped Brownies were a huge hit, but I haven't been giving brownies their due here On Sugar Mountain and I mean to change that. Why the sudden change of heart you may ask?


Well to be truthful I've never been a huge brownie fan. Not that I dislike them, but my longstanding love affair with muffins and just plain old craving for cookies has kept me from realizing the truth...


Brownies are fabulous.


Brownies with candy bar pieces inside of them are out-of-this-world. Really the only reason I did not just at every single one of these brownies is that they need more Twix: a whole layer of side-to-side Twix pieces is in order next time I bake these brownies.

I'll also let you in on a little secret: I have been slacking. Yes, shocking I know, but many a time have I gazed at a brownie recipe, seen that it needed un-sweetened chocolate, and (cringe) used chocolate chips in their place.


What was I thinking? That it was a money-saving, easy substitution, but friends, the unsweetened chocolate is key to establishing a deep, rich chocolate flavor in brownies. I apologize to all brownie lovers; I knew not what I did and I am sorry.

Needless to say you must make these brownies; even if you aren't partial to Twix (though I do not know how such a thought is possible) you can easily substitute Reese's Pieces, Snickers, or any candy that suits your fancy.

Oh, and before I go, did you happen to notice my adorable little milk bottle? Here's another secret for you that I'm sure you'll love: don't spend the money ordering glass milk bottles online. The Starbucks mini Frappuccino bottles, when the plastic wrapper is ripped off, look just like them and you get an excuse to indulge in a deliciously sweet coffee drink!


Happy Baking!


Twix Brownies Via MyBakingAddiction

3/4 cup butter, cut into 1 tbsp cubes
4 oz chopped unsweetened chocolate
1 1/4 cups sugar
1 tsp vanilla
1/4 tsp salt
3 eggs
1 cup flour

16 fun-size Twix Bars, chopped into bite size chunks

1. Preheat oven to 350 and line one 8x8 pan with aluminum foil and spray with cooking spray.
2. Put butter and chocolate in microwave safe bowl and microwave on 20 second increments until butter completly melts. Then stir until chocolate melts.
3. Whisk in sugar, vanilla, salt, and then eggs until fully incorporated.
4. Slowly stir in flour, mixing until just combined.
5. Pour half of batter into prepared pan, then sprinkle Twix all over the brownies. Cover with remaining brownie batter and then bake at 350 for 30-35 minutes or until toothpick comes out clean. Let cool before cutting into bars.

Friday, June 8, 2012

Blueberry Pie Bars

Hello friends!

Who knew that while gallavanting through Portland I would actually get a chance to bake up something myself?

Well, I did. My boyfriend, Josh, had come to me a few days before vacation to tell me that his grandmother (a master baker if I ever knew one) wanted to know if I'd like to bake something for the family while I was up there.

I, of course, said yes, not realizing just how much his family loves food. By the time it came down to it, I was convinced they were as in love food as I was (a scary thought), and baking for a whole group of foodies was now slightly intimidating. Especially after experiencing Standard Baking Company, Two Fat Cats Bakery, and of course, Josh's grandma's out-of-this-world carrot cake. Oh, and his grandpa's sticky buns. All from scratch.


But, I had my plan. I knew blueberries were a big deal up in Maine, so I had bookmarked this recipe from Kirbie's Cravings for Blueberry Pie Bars. They seemed simple enough but still able to pack a punch, and I really was (as always) in it to win it.


Oh, and I almost forgot to mention: do you see these eggs?

Now you know me; as a college student I can't afford to jump on the organic bandwagon. But when I didn't have enough eggs and mentioned this to Josh's grandmother, she said simply "oh we will see if Karen's chickens laid any today."

Yes, my friends, these eggs came from a chicken that morning. They do not joke around up here about fresh ingredients. Josh's aunt Karen owns a few, and now I had the honor of utilizing the freshest eggs I could ever possibly hope to obtain in my blueberry pie bars. I love this place.


So, into the oven it goes, and thank you Kirbie's Cravings, because the scent of this quickly filled the house and even reached the adjacent porch. Soon I had questions of "how long until it'd be done?" "Do we have ice cream to go with it?"


We served them up with a small scoop of vanilla, and I have to say I, with everyone else at the table, cleaned my plate when it came to these. A golden, crispy top with an almost custard-like texture in the center, bursting with fresh blueberry flavor - these are a crowd-pleaser if I ever knew one. They went almost too quickly in my opinion, and so I think it may be necessary to double the recipe next time I make it.

So ends my wonderful vacation in Maine. Parting was of course, such sweet sorrow, but I can only hope that I will return to the food-loving city again soon so that I may explore even more of it's deep culinary treasures.


Blueberry Pie Bars Slightly Adapted Via Kirbie's Cravings

for the crust/topping:
1 1/2 cups flour
3/4 cup sugar
1/8 tsp salt
3/4 cup cold butter

for the filling:
1 cup sugar
2 eggs
1/2 cup sour cream
3/8 cup flour
1/2 tsp vanilla extract
16 oz fresh blueberries

**Preheat oven to 350 and grease one 9x9 in pan with butter/cooking spray**

1. Make the crust/topping. Sift together flour, sugar, and salt in a medium bowl. Cut cold butter into the flour mixture. Use pastry cutter or two knives to begin mixing butter into flour mixture, then use clean hands to continue until mixture resembles coarse crumbs. Save 1 1/2 cups of the mixture for the topping and use the rest to press into a well-greased 9x9 square pan.

2. Make the filling. Whisk together sugar and eggs in medium bowl until well combined. Whisk in sour cream and vanilla extract. Fold in flour until just combined then gently fold in blueberries. Pour filling on top of crust and bake at 350 for 45-55 minutes, until it just begins to brown around the edges.
3. Serve up like a cobbler while still warm OR let cool completely to cut into bars.