Showing posts with label sugar. Show all posts

Tuesday, October 9, 2012

Caramel Stuffed Apple Cider Cookies

Hello friends,

So woah did it get chilly. Like really chilly.

Like oh-my-god-how-is-it-only-35-degrees chilly. Talk about waking me up this morning. All I had to do was step outside and I was bright eyed and shivering my butt all the way to work.

But I have a way to remedy this.

Yes, I may have an issue with turning to desserts when I'm stressed but in case you didn't already know...

STRESSED is just DESSERTS spelled backwards.

So...I didn't come up with the idea. Blame Fate.


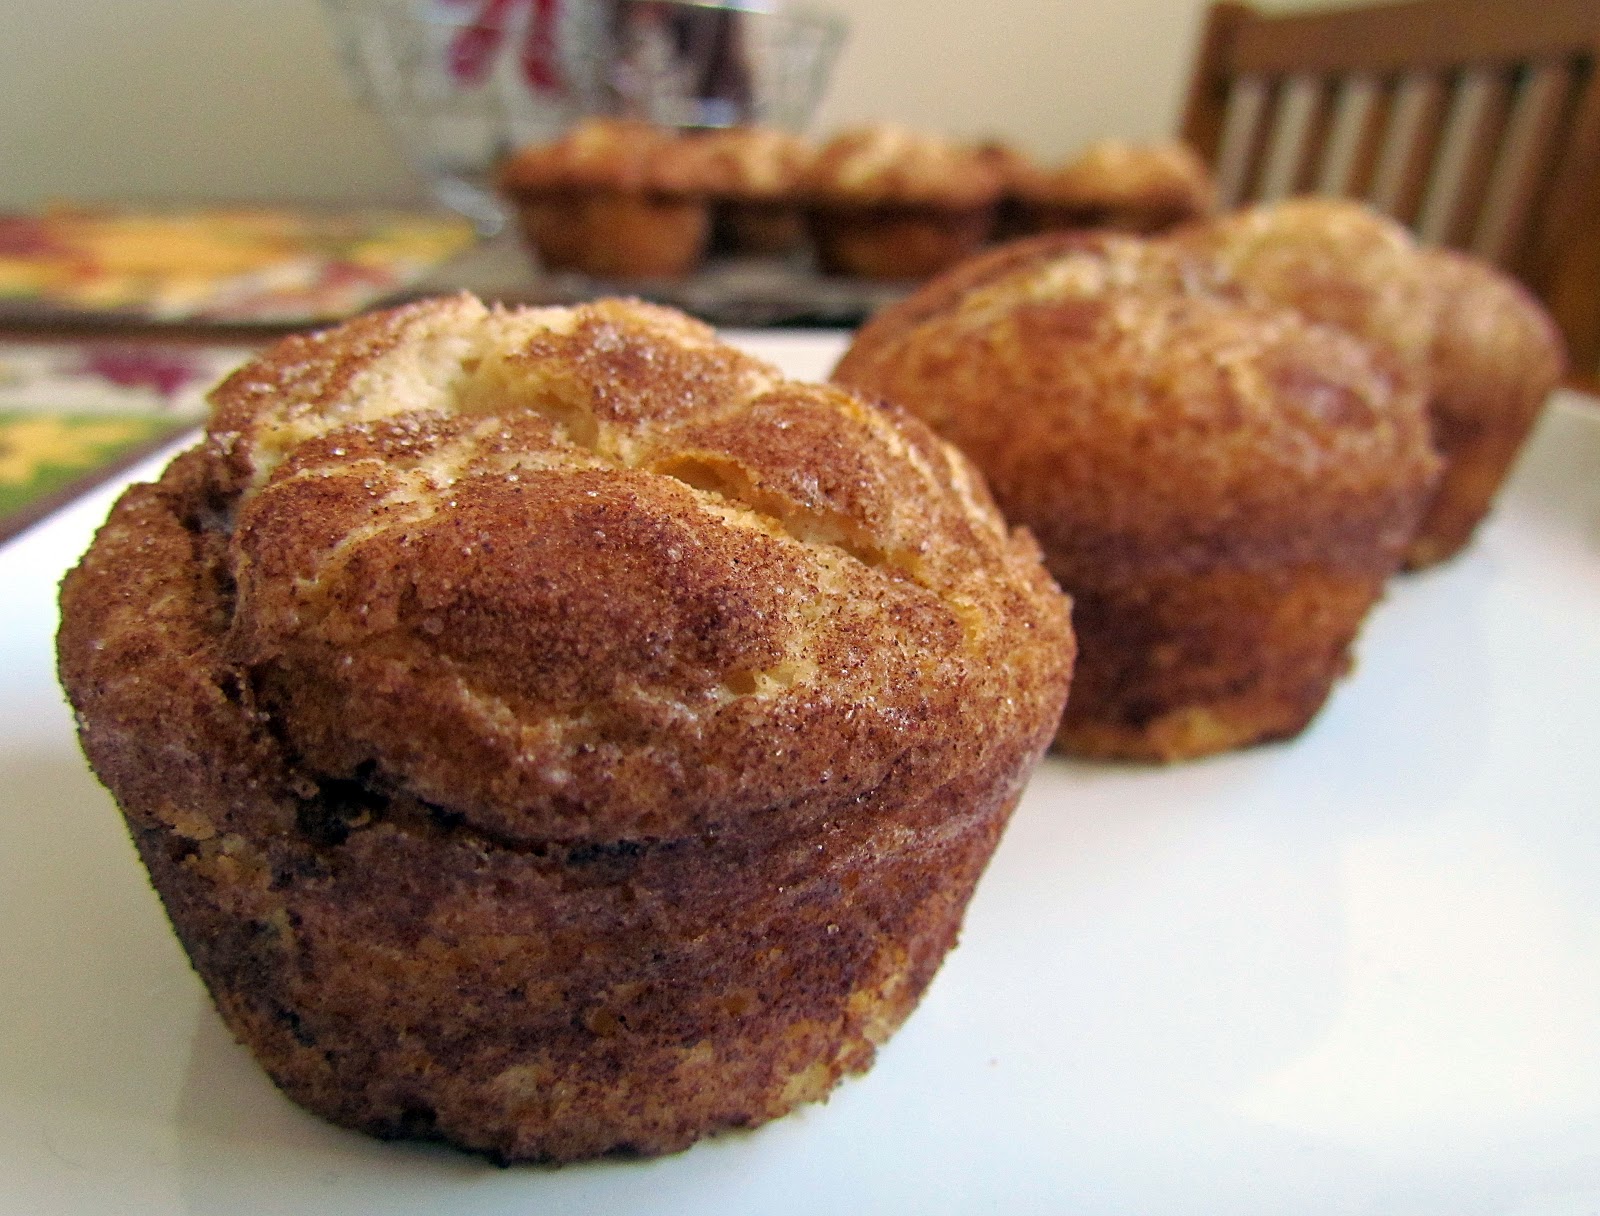
Or thank her really for directing me to these Caramel Stuffed Cider Cookies.

Also, last week I told McCormick to stuff it because I learned how to make Homemade Apple and Pumpkin Pie Spices.

This week: Starbucks gets to stuff it. Because I now have a Caramel Apple Spice, in cookie form.

Delicious, warm, chewy, portable, and way cheaper than that $4 cup of cider I always feel guilty buying.


A few hints or helpful thoughts for this recipe: chill the dough for at least 30 minutes before trying to wrap it around the caramels. It is seriously too sticky when you first make it.

Also: do NOT lick you fingers or you will pucker in sad regret.

One last note: some of your cookies may "bleed" caramel (ew) so I would suggest letting them sit on just the parchment paper (slide it off the pan) for a few minutes until the caramel cools.

But oh man, it's like, if there was ever a Caramel Apple Cider Twix Bar....

Dude. Twix: Get on that. Right now. Oreos already upped the ante with those crazy Candy Corn Oreos.

Or I will just have to create it myself :O

Happy Baking and Stay Cozy!


Caramel Stuffed Apple Cider Cookies  
Via SixSistersStuff

1 cup butter, almost melted
1 cup sugar
1 whole box (10 packets) Alpine Spice Cider Mix
2 eggs
1 tsp vanilla extract
1/2 tsp salt
1 tsp baking soda
1/2 tsp baking powder
3 cups flour
1 bag Kraft Caramels

1. Preheat oven to 350 degrees and line cookie sheets with parchment paper.
2. In a large bowl beat butter, sugar and all the Cider Mix packets until well incorporated and fluffy. Beat in eggs, vanilla and salt.
3. Beat in baking soda and baking powder, then mix in flour until dough comes together. Let dough firm up in fridge for 30 minutes.
4. Scoop out heaping tablespoonfuls of dough and use your thumb to create an indent in the center. Quickly place caramel in the center and roll dough over it, covering the candy completely. Place each 2 inches apart on prepared cookie sheet
5. Bake at 350 for 12-14 minutes or until edges begin to brown. Let cool on parchment paper for 5 minutes before twisting and then removing to wire rack.

Makes 16-18 large cookies

Thursday, September 20, 2012

Snickerdoodle Muffins

Hello all,

I think we've established here on Sugar Mountain that I have a bit of a muffin obsession. I'm sure you are thinking "Totally understandable - muffins are freaking amazing" but in case you are one of the few who still doubts the delectable delight that is the muffin, I bring you these Snickerdoodle Muffins as proof.


Of course, you could also check out Strawberries & Cream Muffins, Lemon Streusel Coffee Cake Muffins, Red Velvet Muffins, or any other muffin lovin' recipe on my Recipe Index Page.

We will make a believer out of you.

Besides their deliciousness, I also love muffins because they are simple. If I have a bake-o-phobic friend who wants to learn how to whip up something sweet, I always point to a muffin recipe. They are so forgiving and so much fun; once you start you will quickly end up with millions of muffins in your kitchen.

Though, to be fair, these muffins were a tad more like cupcakes in preparation. Creaming butter and sugar are usually not on my "To-Do" when I'm making muffins, but the photos on EatmeDelicious were absolutely mouthwatering and I could not resist trying them. I also love any excuse to break out my Vietnamese Cinnamon. :D But even if you are a new baker or inexperienced, do not shy away from these!

Different does not always mean difficult.


Say hello to the thickest muffin batter known to man. You will need (or have after this!) some serious arm muscles to work that thing into shape.


Using an ice cream scoop, you measure out the batter and drop it into a cinnamon sugar mixture, and it holds its shape. Weird.

Roll it around real quick and plop it into a heavily greased muffin pan. They may look a little humble now, but oh, just wait. The smell alone that fills your house (or my tiny college apartment) is enough to get anyone craving a snickerdoodle. Be prepared for the masses to come running.


Not only were these fun to make (and eat of course!) they also ensured my hopes that Fall is on it's way. The crisp, cool air in the morning, the slow incorporation of cardigans and sweaters into people's wardrobes,   Pumpkin Spice Lattes at Starbucks, and now Snickerdoodle Muffins.

My life is complete, for now anyway.

Check back next Tuesday for more Fall-weather Favorites and Chai Spiced Sugar Cookies!

Happy Baking!


Snickerdoodle Muffins Via EatMeDelicious

2 sticks unsalted butter, softenend
1 cup sugar
2 tsp vanilla
2 eggs
3/4 tsp baking soda
3/4 tsp baking powder
3/4 tsp cream of tartar
3/4 tsp nutmeg
1 1/4 cup sour cream
2 1/4 cup flour

1 tbsp cinnamon + 1/2 cup sugar

1. Preheat oven to 350 degrees and heavily grease muffin pans with cooking spray or butter. In a small bowl,  combine 1/2 cup sugar and 1 tbsp cinnamon. Set aside.
2. In a medium bowl, whisk together flour, baking soda, baking powder, cream of tartar, and nutmeg.
3. In a large bowl cream butter and sugar until light and fluffy, 2-3 minutes. Beat in vanilla, then eggs, one at a time, until well incorporated.
4. Add flour mixture and sour cream to egg mixture in an alternating fashion, starting and ending with the flour. Stir until just combined, being careful not to overmix.
5. Using an ice cream scoop, measure out muffins one at a time, and drop the batter into the cinnamon/sugar mixture. Roll around in mixture, being sure to cover completely, then place muffin in greased muffin pan. Repeat until you run out of muffin batter.
6. Bake at 350 for 20-22 minutes or until a toothpick inserted in the center comes out clean.
7. Let cool in pan 10-15 minutes before removing to wire rack to cool completely.

makes approximately 12-16 muffins

Thursday, September 6, 2012

Nutella Stuffed Muffins

Why hello there!

It's been AGES I know, but I am so happy to be back to blogging and back at good old Rutgers University. True, the bus system is still horrendous and for some reason air conditioning only reaches certain classrooms in certain buildings. but nonetheless I am moved back into my apartment and ready for the new semester.


I am also super excited to be writing this post from the brand new Barnes and Noble on campus! It's three stories of nerdy awesomeness, and TED ALLEN will be showing up here in roughly twenty minutes for a book signing! Needless to say I have staked out a nice spot to (hopefully) snap a quick picture of him to share with you all, so fingers crossed!

Now back to the title of this post: stuffed muffins. Yes, we have done stuffed cookies here On Sugar Mountain, and stuffed cupcakes, but now all boundaries are broken with the help of our old friend Nutella.


So this starts out as your run-of-the-mill muffin recipe; mix dry ingredients, mix wet ingredients, and stir until just combined. But then things get interesting once you begin to fill your muffin pans...


Fill the cavities a tad less than halfway with muffin batter, then go ahead and put a big ole' dollop of Nutella in the center. Of course, Nutella naturally fights to stay on the spoon instead of off of it, so two spoons may be necessary at this point.

Then cover with more muffin batter and bake until scents of cinnamon, nutmeg and Nutella fill your kitchen. What a stress-relieving aroma let me tell you.


These are cute and delicious on their own, but why stop here? What could make a Nutella-stuffed muffin even more gratifying? Oh I don't know....how about dipping it in melted butter and cinnamon sugar?


I thought so.


Whether you're starting a new semester, feeling frazzled or just in the mood for some seriously comforting sweet treats, these muffins are absolutely, positively the way to go.

Oh and just a bit of shameless self-promotion before I go, the new blog The Foodie Files has begun! Click here for my first post and check over there tomorrow for an out-of-this-world recipe for Tuscan Bean Soup.

Until next time,

Happy Baking!

Nutella Stuffed Muffins Via DamnDelicious
makes roughly 16 muffins


3 cups flour
1 cup sugar
1/2 cup vegetable oil
2 eggs
1 1/2 cups milk
2 tsp vanilla
4 tsp baking powder
1/2 tsp salt
1 tsp cinnamon
1/2 tsp nutmeg
16 tsp nutella

cinnamon sugar topping:
6 tbsp melted butter
4 tsp cinnamon
1/2 cup sugar

1. Preheat oven to 400 degrees and grease muffin cups with cooking spray.
2. In a large bowl, combine flour, sugar, baking powder, salt, cinnamon and nutmeg.
3. In a medium bowl whisk together vegetable oil, milk eggs, and vanilla.
4. Pour wet ingredients over dry ingredients and stir until just combined, being careful not to overmix.
5. Scoop a small amount of batter (half of what you would normally use, maybe 2 tbsp) into the bottom of each muffin cavity. Then, drop a teaspoon of nutella in the center of each. Cover nutella with more muffin batter.
6. Bake muffins at 400 degrees for 13-17 minutes or until a toothpick inserted comes out clean. Let cool for 10 minutes in pan before moving to wire rack to cool completely.

7. For cinnamon sugar topping: stir together cinnamon and sugar until well incorporated.
8. Grab muffin from bottom and gently dip top into the melted butter and then quickly into the cinnamon-sugar mixture.


Tuesday, August 7, 2012

My 100th Blog Post & Oatmeal Chocolate Chip Cupcakes

Hello friends!

I still can't quite wrap my head around the idea that this is my 100th post on OnSugarMountain. It's been a little over a year since I started this baking blog, and it's taught me so much.

Some quick tidbits I've learned about baking:

1. Cupcakes are not always easy. Do not look down upon a cupcake. They can be quite awesome and take more work than you might imagine. See Banana Split Cupcakes & Homemade Hostess Cupcakes


2. Stuffing anything with nutella is an AWESOME idea and we should all try to do it as often as we can. See Nutella Stuffed Sugar Cookies & Nutella Stuffed Cupcakes


3 .Muffins are NOT just ugly cupcakes. Muffins can be sweet little mouthfuls of heaven without any frosting. See Strawberries & Cream Muffins


4. Eggless Cookie dough exists, can be eaten without getting sick, and is freaking fantastic. See Cookie Dough Topped Brownies


5. Baking can bring people together in ways that nothing else can. We can make friends, stuff our faces, and do it all while helping out those less fortunate than us.


On a larger scale and with the risk of sounding philosophical, this blog and all the adventures that accompany it led me to learn a great deal about myself. I know I said this blog was to document my adventures in baking until I opened up a bakery of my own, but I've realized something; the part I love the most about baking, eating, food, all of it, is the experience, and I could never turn it into a job that I'll eventually resent. Seeing people's faces light up when I bring in brownies to work, or hearing a collective "mmmm" as everyone takes a bite, I know I've brightened up their day, if only for a moment. I love that.

I love it so much that turning into something I will stress about is not an option. I could never risk turning baking into an activity I look at with exhausted eyes and think "I so do not want to bake today." Food, for me, will always be about the experience, about enjoying every single morsel of a meal and most importantly, sharing it with friends and family.


So opening my own bakery may not happen, but that doesn't mean I can't change the way we all have come to see food. How can I do this you ask? By doing exactly what I am doing right now. Blogging. Writing. Sharing. Doing. Food is such an intrical part of our lives but we've let it fall to the wayside in lieu of other "more important" things to stress about, such as our jobs, the economy etc etc. OR we stress about food too much and jump on every dietary bandwagon that rears its ugly head.

I want to remedy this. I want people to experience the love that can come from food. Our lives, now more than ever before, need balance. What better way to balance the stresses of our everyday lives than relaxing to come together around a table?

And so, drumroll please....

I'm starting a new blog this September!


On Sugar Mountain will still be up and running twice a week, but I hope that you will will come check out my new blog, The Foodie Files, where I hope to show people just how important food is to each and every one of us.

Phew. Lots of sharing going on in this post. Now it's finally time for the food!


Oatmeal Chocolate Chip Cupcakes. Make them. You'll love them. I promise. It's like a chewy oatmeal cookie, riddled with chocolate chips, baked into tiny cakes then covered with a mind-blowing cinnamon sugar frosting. Give one of these to a new acquaintance and I'm betting you two will be bffls in no time.

Lastly, I want to thank each and every one of you who read my blog. It makes my day to see comments posted about what I bake or a new follower pop up on my Dashboard. I've met wonderful people in creating this blog and I hope to meet so many more.

Until next time,

Happy Baking!


Oatmeal Chocolate Chip Cookies Via HowSweetEats

3/4 cup brown sugar, loosely packed
1 egg
1/2 cup butter, melted and cooled
2 tsp vanilla
1/2 cup oats
1 1/4 cup flour
1 1/4 tsp baking soda
1/4 tsp cinnamon
1/4 tsp salt
2 tbsp milk
1/2 cup chocolate chips tossed in a sprinkle of flour

1. Preheat oven to 350 degrees and line one 12-cup muffin pan with liners.
2. Beat egg and sugar until smooth, then beat in melted butter and vanilla.
3. Add oats, flour, baking soda, cinnamon and salt to egg mixture and stir until incorporated. Stir in milk then fold in chocolate chips.
4. Pour 1/4 cup of batter into cups then bake at 350 for 16-18 minutes or until tops spring back lightly when touched. Let cool in pan for 5 minutes before removing to wire rack to cool completely.

Cinnamon Sugar Chip Frosting

1 cup butter, softened
2 cups powdered sugar
1/2 cup brown sugar, loosely packed
1/4 tsp cinnamon
1 tbsp vanilla
1/3 cup chocolate chips
1 tbsp milk (optional)

1. Beat butter until light and creamy, then slowly beat in powdered sugar.
2. Add brown sugar, cinnamon and vanilla and beat until fluffy. Add milk if frosting is too thick.
3. Fold in chocolate chips.

Friday, August 3, 2012

DIY Vanilla Sugar Scrub

Hello friends,

If you love baking as much as I do, then you'll understand my need to bring it into every single part of my life. Baking, eating, and now smelling like a cupcake. Yes, you are still on the right blog. No, you did not misread the title. I plan on sharing with you the wonderful  secret I've learned thanks to sites like Pinterest.


You can make your own deliciously scented, economically awesome, body scrub. I have dropped at least $20-30 bucks on a precious jar of scrub from Sephora or Ulta, but no more! This recipe, including the glass mason jar I keep it in, comes in at roughly under $3 a batch.

Did I mention that you will have all of these ingredients already in the pantry? Oh and it's totally okay for sensitive skin. I break out even if the water is too hot in the shower, but this scrub leaves my skin baby soft and without a bump.


Here's our wonderful cast of characters: white sugar, brown sugar, vegetable oil, and vanilla extract. Feel free to splurge and pick up coconut oil or sunflower oil, but canola works just fine and does not have any unwanted smells, like olive oil. Also, you'll need the container you plan on storing the scrub in. I use a mason jar because I like the airtight seal and it's just super cute, but if you have kids or are afraid of shattered glass, just pick up a heavy duty tupperware container.


Fill your container with equal parts white and brown sugar, or as close as you can get. The great thing with this recipe is that it's pretty much adjustable to any kind of ingredients you have on hand. I even do all white sugar with fresh lemon zest for a to-die-for citrus scrub.


Pour out the sugars and mix them together until it looks like you have a bunch of beach sand. Pack the sugar back into your jar, then add about one tablespoon of vanilla extract and a few tablespoons of oil. Let the oil and extract seep into the sugar completely before adding any more oil. You want the oil to penetrate about 1/2 way down the sugar mixture.


Then turn it out one more time into a bowl and mix with your fingers until scrub comes together. When you wash your hands after this you will already begin to notice how awesome this scrub feels.


And that's it! Pack it back into your jar, screw on your lid and you're good to go. Want more scrub ideas? Here's some links with some great ideas for other scrubs that are great on your skin AND on your wallet.

DIY Citrus Salt Scrub
DIY Pumpkin Spice Sugar Scrub
DIY Beauty Tips (with Body Scrub Recipe)

And don't worry; I'll be back next week with a delicious cupcake I've been aching to try out from HowSweetEats.

Until then,

Happy scrubbing!

Tuesday, July 31, 2012

S'mores Cookies

Hello friends,

Can you believe that I am having even more ingredient mishaps? Though truth be told, the molasses ended up being an ingenious addition to the Oatmeal Creme Pies. But this is another matter entirely. Why is it that as soon as I want to make these S'mores Cookies from Kevin&Amanda that I've had pinned for weeks, all of a sudden these Mallow Bits are absolutely nowhere to be found?!


Thank goodness my Mom had bought them awhile back, but there was barely any left of the entire container by the time I got my hands on it. Naturally I needed a whole cup of these adorably tiny marshmallows, which was most certainly not how much was left. Luckily, I managed to split the recipe in half, though it sadly yielded only one dozen cookies. Seriously, when are 12 cookies enough for anyone? But I guess it's better than the horror that would be no cookies.


I've become quite good at halving recipes, usually with positive results, though I am always a bit wary of measuring out half an egg. If you are too, InKatrina'sKitchen has some lovely tips and tricks that will help you halve any of your favorite recipes that only call for one egg. The other ingredients were easy enough to cut down and included what one would expect for a S'mores Cookie: crushed graham crackers and lots of chocolate chips. Brown sugar is always a nice touch too.


So I have to come clean. I do love s'mores, but a lot of the desire for making these cookies came from the image of the cookie dough I pinned to Pinterest. Case and Point: Don't you just want to reach in and eat all of that beautiful marshmallowy mess as is? I really really wanted to, but remember I had to cut the recipe in half because of those blasted marshmallows. So no dough could be snatched by frivolous fingers and eaten happily by yours truly. Better luck next time I guess.


I'm glad I waited. My only complaint is that my cookies did not spread anywhere near as much as the original recipe appeared to, but regardless they are chewy, wholesome cookies with marshmallows and chocolate in every bite. It's like the chocolate chip cookie got jealous of s'mores and decided they should team up to make one awesome super cookie. Oh and the other complaint (I'm sorry I know I said I only had one) is that there weren't enough!! I better see those Mallow Bits back on the shelves ASAP because these cookies will not last long.

Until next time,

Happy Baking!


S'Mores Cookies Via Kevin&Amanda

1/2 cup softened butter
1/2 cup white sugar
1/4 cup brown sugar
1 egg
1 tsp vanilla
1 1/3 cups flour
3/4 cup graham cracker crumbs, finely processed
1 tsp baking powder
1/2 tsp salt
1 cup mini (or regular) chocolate chips
1 cup Mallow Bits

1. Preheat oven to 350 degrees and line cookie sheets with parchment paper. Spray parchment paper with cooking spray.
2. Cream butter and both sugar until well incorporated. Beat in egg and vanilla. Meanwhile in a separate bowl sift together the flour, graham cracker crumbs, baking powder, and salt.
3. Add dry ingredient mixture to wet ingredient mixture and stir until dough comes together. Stir in chocolate chips and mallow bits.
4. Drop rounded tablespoonfuls of dough onto prepared baking sheets, leaving space between for spreading.
5. Bake at 350 for 10-12 minutes or until edges begin to brown. Let cool on pan for 2 minutes before removing to wire rack to cool completely.

Yield: roughly 2 dozen cookies

Monday, July 2, 2012

Patriotic Fruit Pizzas

Hello friends,

Have I got a simple and super fun fourth of July treat to share with you all!

Who know sugar cookies could get such an upgrade?

Yes, fruit pizza - the sweetest of all pizzas, and the easiest fix for a patriotic dessert to impress all your friends. I opted to go with individual hand-sized pizzas, so that no one would feel too guilty about eating, say, six of them. Not that I did any such thing...


Start with some sugar cookie dough. You can use your favorite recipe, or go with this one I found from Julie Blanner . They are so soft and chewy that it has quickly become my go-to recipe for sugar cookies.


While the cookies are baking, whip up some delicious cream cheese frosting. Intead of adding vanilla extract, add a touch of lemon juice. It enhances, as opposed to overpowers, the fresh, sweet flavor of the berries.. Smear some cream cheese frosting on top of your completely cooled cookies, then have at it with whatever fruit your sweet tooth desires.


With the 4th of July less then twenty-four hours away, I thought it only fitting to work with blueberries and strawberries, which coincidentally happen to be my favorite fruits. You can, of course, use any other fruit you like. Raspberries, blackberries, kiwi, pineapple - that's what I love about this recipe: its versatility.


With a thick sugar cookie base, cream cheese frosting with the slightest hint of lemon, and fresh berries, these patriotic pizzas are sure to please at any party (I do love my alliterations don't I? Sorry friends, just coudn't help it).


Happy Baking (and Happy Fourth of July) !

Patriotic Fruit Pizzas Via JulieBlanner

Sugar Cookies:

2 1/4 cups flour
1 sugar
1/2 cup (1 stick) softened butter
1/2 cup sour cream
1 egg
1 1/2 tsp vanilla
1 tsp baking soda
1/4 tsp salt

1. Preheat oven to 375 degrees and line two cookie sheets with parchment paper.
2. In a large bowl beat together butter and sugar until light and fluffy. In separate bowl, sift together flour, baking soda, and salt.
3. Add egg, sour cream, and vanilla to butter mixture and beat until well incorporated. Gently fold dry ingredient mixture into wet ingredient mixture until dough comes together.
4. Scoop tablespoonfuls of dough onto prepared cookie sheets, leaving space between them for spreading. With lightly floured fingers, gently flatten cookies to 1/4 inch thickness.
5. Bake at 375 for 7-8 minutes. Do NOT overbake. Cookies will look slightly underdone. That is okay.
6. Let cool completely on cookie sheets before removing to plate/wire rack.

Cream Cheese Icing:

8 oz softened cream cheese
2 cups powdered sugar
2 tbsp lemon juice

1. Beat all ingredients until smooth

Toppings:
strawberries, sliced
blueberries
any other fruit of your choice
Assembly:

1. Top cookies with dollop of cream cheese icing. Using a butter knife or offset spatula, smooth icing so that it is flat.
2. Cover with berries/fruit of your choice. Keep refrigerated for up to 3 days.