Showing posts with label strawberry. Show all posts

Friday, July 6, 2012

Experiencing Macarons at Sophie's French Bakery

Hello friends,

I hope you all had a wonderful 4th of July! I know we did. It definitely was not a typical one here though. My brother and Dad were off for the week to a baseball tournament which meant my Mom and I got some much needed girl-time. Besides meandering around our favorite shops like anthropologie and Williams Sonoma, Mom and I drove over forty minutes for....


macarons.

Not the most patriotic way to celebrate, I know, but I do think that supporting small business is quite American, so I'm pleased to say scarfing down some Key Lime and Strawberry Cheesecake Macarons was a perfect way to cap off the mom/daughter time.

Sadly I have no recipe for French Macarons, but I just really wanted to share with you all this gem of a French Bakery we've come to love here in Florida. It's called Sophie's French Bakery and it's in an adorable part of Tampa known as Hyde Park.


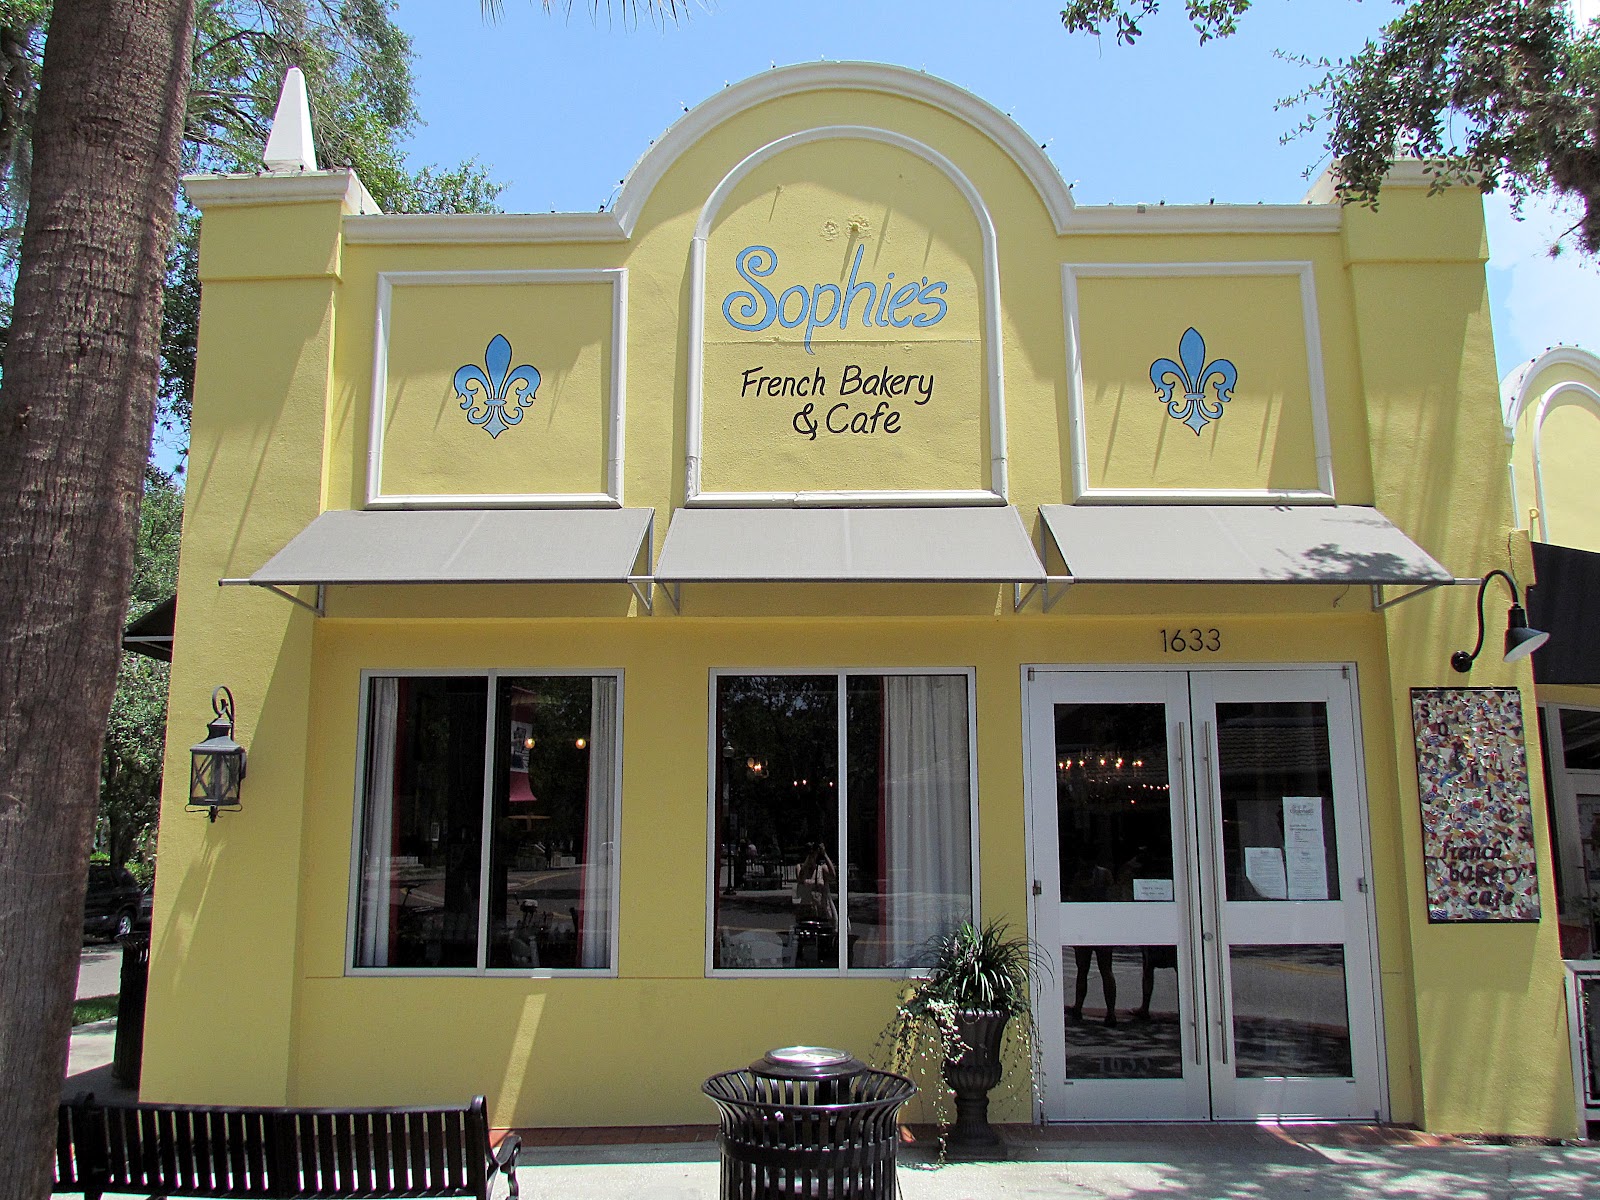
We discovered this bakery while visting the Hyde Park Market that occurs on the first Sunday of every month and features artisan foods, handmade jewelry, and fresh produce. After walking around in the blistering heat, we decided to stop into the bakery to grab a bite to eat and cool off.


Little did we know we'd fall head over heels for their out-of-this-world macarons.These were the first macarons my mom and I had ever encountered in real life, only having seen them all over Pinterest and drooling over them if caught on camera by Food Network. Meringue never came across to me as appetizing, but how could a cookie sandwich that cute taste bad?

The answer: it doesn't. It's one of the most delicate, heavenly llittle treats I've ever had, and after having just one lemon-flavored macaron from Sophie's, I knew I would be back for more. Now every time I come to visit my family in Florida, we make sure to take the drive and stop over to this bakery and sample whatever flavors they happen to have on that day. On the fourth, it just happened to be Key Lime and Strawberry Cheesecake.


Now the Key Lime was great, but the real show-stopper here was the Strawberry Cheesecake. The subtle yet distinctive flavor of strawberry from the shells combines with the creamy cheesecake filling to just melt in my mouth in one glorious bite. It had disappeared before I even realized I had eaten the whole cookie, and I found myself frowning at my empty hand, wishing if I closed my eyes another would appear between my fingers.

I have visited France before, but sadly I was only an awkward young teen and the word "macaron" did not exist in my dictionary. While enjoying a home-stay with a family in the French Riviera, we had stopped at the family bakery and were allowed to have whatever we wanted to sample. Naturally I went right to the baguettes, the scent of bread overwhelming me from any other thought. Now, looking back, I wonder if there had been macarons either in their shop or in the nearby market. Perhaps one day I will journey back there, and experience what a French Macaron in France tastes like...


Until then I will keep myself content with the macarons at Sophie's Bakery. Though I am sure the ones in France are phenomenal, I can't say I will be sacrificing much when Sophie's are just so delicious. Beautiful to look at and heavenly to consume, I can't wait to go back and find out what new flavors they decide to create.

Until next time,

Happy Baking!

Friday, June 15, 2012

Strawberry Blondies

Friends,
I write to you in a slightly disappointed frame of mind today. Sadly, this is one of the posts where things did not going according to plan, and I feel like renaming the blog "On Soggy Mountain" or "On Mushy Mountain" as I bow my head in shame.


Sigh. I was so in love with the Twix Brownies earlier this week, I thought I'd attempt a blondie as a nice point of comparison between bar cookies. I also just wanted to eat an entire batch of these Strawberry Blondies from Love&Olive Oil (which I will now not be able to do. Grr.). It started out great; white chocolate, butter, eggs, strawberries, flour, pretty simple, or so I thought. Into the oven it went. Golden brown on the exterior, the knife came out clean, and out of the oven they came....

only to my sad realization that the underneath the enticing exterior lay a mushy, soggy, disappointing interior. Maybe it's a sign that I should ease up on the sweets (hah, right) but soggy or not, I could always use the extra photography practice.

I managed to grab a few decent shots, and I love this one with the new baby cupcake stand. Can you believe it was only $3? Now that's my kind of pricing for food props. It's still taking me awhile to learn all my angles, and I've started this new pinboard on Pinterest with food photography I aspire to/take inspiration from when I am attempting to photgraphy my not so splendid brownies.


I'll include the recipe here with the suggestion that lowering the oven temp to 325 (as opposed to 350) and increasing the cooking time may help you avoid a mushy mess of blondies. I'm off to find a recipe that will soothe (and feed) my fractured ego.

But as always, Happy Baking!


Strawberry Blondies Slightly Adapted Via Love&OliveOil

5 oz white chocolate, chopped
1/3 butter, cut into chunks
2/3 cup sugar
2 eggs
1/4 tsp baking powder
1/4 tsp salt
1 tsp vanilla
1 cup flour
1 cup strawberries, sliced

1. Preheat oven to 325 and line one 8x8 pan with aluminum foil and spray foil with cooking spray.
2. In microwave safe bowl, heat butter and white chocolate in 15 second increments, stirring chocolate and butter in between microwaving until melted. Stir in sugar.
3. Whisk in eggs and vanilla. Stir in flour, salt, and baking powder until just combined, then fold in strawberries.
4. Pour into prepared pan and bake at 325 for 40-45 minutes, or until set and toothpick comes clean out of the center.
5. Let cool completely before slicing into bars to serve.

Monday, April 9, 2012

Banana Split Cupcakes

 Hello all,

So did any of you guess what this post would be about from my hint last week?


Well if you guessed Banana Split you get an A+ in my book. 'Banana Split' you may wonder 'how on earth do you turn an ice cream sundae into a cupcake?' My friends, it was hard for me to believe too, at first, but it's been done in the most perfect way by ConfessionsofaCookbookQueen and I am so delighted to share it with you here.


Step 1 - Take a French Vanilla Cake Mix and turn it into a delicious, soft, moist Banana Cake. Then proceed to cut a decent sized hole in the center of the cupcake and fill it with, would you believe it, Marshmallow Fluff.


As if this wasn't enough to make you drool, Step 3 is whipping up some decadent homemade Strawberry Buttercream and piping a unhealthy sized amount on top to hide the fluff and all it's marshmallowy goodness from unsuspecting taste-testers.

Now here's where I deviated. She suggested using Chocolate Sauce (like Hershey's chocolate syrup for example) but for me, I planned on having these around for more than a few days and needed a chocolate topping that was a little more sustainable and a little less "it's going to drip all over the kitchen table all week". So I opted to melt chocolate chips and drizzle it on top of the Buttercream instead. Add a dash of sprinkles and a cherry and voila!


Banana Split Cupcakes. I can't even express in words how amazing this cupcake is. It could very well be my most favorite miniature-sized dessert ever in existence. Though I do have an unhealthy obsession with cake pops...see now if we could turn this into a cake pop THEN we'd be getting somewhere.

And honestly, it's not that overwhelming to create yourself. It's a little more time consuming than other cupcakes, but just in that there are many steps to go through. The fact that she doctors a cake mix will save you tons of time (and less mess!).

Plus, if you're like me and need a distraction every now and then, just do these cupcakes in steps throughout your afternoon. I baked the cupcakes, then let them cool while I read half of one novel for class; then I'd frost them and read the other half of the novel, etc.

See? Procrastination can be turned into progress with the help of cupcakes!


Happy Procrastinating Baking!

Banana Split Cupcakes Via ConfessionsofaCookbookQueen

1 box French Vanilla Cake Mix
1/2 cup butter (1 stick) melted
4 eggs
3/4 cup water
2 medium ripe bananas, mashed

1 jar (7oz) marshmallow fluff

1. Preheat oven to 350 degrees and line 2-12 cup muffin pans with liners.
2. In a large bowl combine cake mix, eggs, water, bananas, and melted butter. Beat with a hand mixer on low for one minute, then on medium/high for another 2 minutes.
3. Fill cupcake liners 2/3 full (I always use a 1/4 cup measuring cup for a guide) and bake at 350 for 12-16 minutes or until cupcakes spring back lightly when touched. Let cool completely before frosting.

4. Once cool, cut a small hole in the center of each cupcake and fill with marshmallow fluff. (I suggest placing the fluff in a large plastic bag, snipping off an end and piping into said holes).

For the Strawberry Buttercream:

1 cup sliced strawberries, pureed
1 cup butter (or shortening)
5-6 cups powdered sugar

1. Beat butter and sliced strawberries together until well combined. Beat in powdered sugar, one cup at a time, until desired consistency is reached.

Assembling the Cupcakes:

1. Pipe Strawberry Buttercream onto the cupcakes, covering the marshmallow fluff center completely.
2. Use chocolate syrup OR melted chocolate chips to pipe the "hot fudge" onto the cupcake. Quickly add rainbow sprinkles and cherry on top.

Tuesday, March 20, 2012

Pop Tart Pops

Hello all,

Can you believe I'm back at college already? Where on earth did my Spring Break go?! Sigh, well, back to real life I suppose. As real as college life is anyway.

Did I ever tell you what a smash hit the homemade pop tarts were? My boss was so happy with them that he heated his up in the microwave and actually ended up burning his mouth on it in excitement. So I wasn't surprised when another supervisor mentioned to me that our boss was really in the mood for pop tarts again. 'But I already did a post on pop tarts' I thought to myself.


'But this was important' she explained 'He won't accept the cinnamon challenge unless you give him more pop tarts.'

Cinnamon challenge you may ask? It's when you ingest an entire teaspoon of cinnamon by itself and try to swallow. Yes, I know, college students have weird ideas concerning entertainment. This is one of them.

But how could I say no to seeing that happen? So I thought to myself 'how do I switch up pop tarts to make it delicious for my coworkers and still new and exciting for my readers?'

Answer: Pop Tart POPS!


Like cake pops, only more pie-ish. I decided to stick with the classic strawberry which is always a favorite, along with a few Nutella-filled Pops for those daring eaters.

I used the basic pop tart pie crust from my previous post here with the only switch of using Nutella as a filling for some along with a chocolate frosting. Can I tell you though, between us, buy the premade pie crust. Seriously, just do it. Homemade is neat and all, but it gets finicky really quickly. and the pre-made is already rolled out to the right thickness and will save you a good deal of time.


Needless to say they are sure to be a huge hit at my job (where I believe I may slowly be giving everyone diabetes with all these treats). If you enjoy your co-workers' company as much as I do, maybe whip a few up for them, or if not, for some hungry housemates!

Oh, and as for the cinnamon challenge? I will try my best to get a video of every exciting second of it for you all to see. I know I can't wait. :)

Happy Baking!


Pop Tart Pops

1 homemade or store bought pie crust (recipe link here)
1 jar strawberry preserves or 1 jar Nutella
Popsicle sticks
Chocolate or Vanilla Glaze

1. Roll out Pie Crust to 1/4 inch thickness and cut into equally sized small rectangles. Place rectangles on parchment-lined cookie sheet and place one Popsicle stick in the center of each.

2. Scoop one teaspoon of filling over Popsicle stick and center of pie crust rectangle. Cover with another pie crust rectangle and use a fork to crimp the edges all the way around.

3. Bake at 350 for 7-8 minutes or until golden.

4. Coat with frosting and sprinkles and enjoy!

Wednesday, March 14, 2012

Fresh Lemon and Strawberry Frosted Donuts

Hello all,

Daylight Savings Time has passed this weekend and I have to tell you, I am LOVING the extra sunlight. It just makes the days so much cheerier, granted I am currently writing to you from Florida (the Sunshine State). I am sure when I get back to NJ I will be greeted by the lovely gray, overcast weather I have come to call my own.


But while I'm still down here catching the rays, I thought I'd share these fresh fruit-frosted donuts with you!


I can't say I looked up the lemon frosting, but sadly I did discover that Strawberry Frosted Donuts, from say Dunkin Donuts, are not frosted with anything that resembles real strawberrries. Gross. 

How are we still okay with that? I mean I understand that if you use real strawberries it wont be as smooth and glossy, but I think that might very well be a sacrifice we are willing to make for real fruit frostings.


Regardless, mine utilize the wonderful fresh strawberries down here in Florida, along with some lovely fresh lemons as well.


I ran into some trouble with lighting for my photos (when does that not happen) but discovered that the sun was the perfect accompaniment to my donuts. Now if only NJ was this bright all the time I'd take all my photos outside each morning!

I've included the basic sour cream donut recipe below along with the new fruit glazes/frostings. Feel free to switch out the lemon juice for lime (key lime donuts anyone?) or use your favorite fruit in place of the strawberries. The possibilites are endless, not to mention delcious.

Happy Baking!


Sour Cream Donuts (makes about 2 dozen mini donuts)
1 1/3 cups all purpose flour
1/3 cup sugar
1 tablespoon baking powder
1/2 tsp salt
1/2 cup milk
1/4 cup vegetable oil
1/4 cup sour cream
1 egg
1 tsp vanilla

1. Combine all dry ingredients in a mixing bowl.
2. In separate bowl whisk together remaining ingredients. Pour liquid ingredients over dry ingredients. Using a mixer on medium speed, blend until smooth.
3. Fill each cooking reservoir with about 2 tbsp of batter.
4. Bake about 4-5 minutes or until donut springs back when touched.
5. Glaze or coat with powdered or cinnamon sugar.

Fresh Lemon Frosting

2 cups powdered sugar
2 tbsp fresh lemon juice
splash of milk

1. Sift powdered sugar into a medium bowl. Add lemon juice and begin to stir. Add milk slowly, until consistency is smooth but still thick.
 
Fresh Strawberry Frosting

1 cup powdered sugar
1/4 cup strawberries
splash of milk

1. Sift powdered sugar into medium bowl. Pulse straberries in food processor until completely chopped. Scrape strawberry puree into powdered sugar and whisk until it comes together. Add splash of milk as needed to create smooth consistency.

 To frost donuts: dip donut in frosting, pull up and allow excess to drip off. Poke hole in center with finger to allow frosting to form to shape of donut. Then allow to dry on cooling rack or dip in sprinkles.

Monday, February 13, 2012

Strawberries 'n Cream Muffins

Hello all,

I wasn't going to post again until Valentine's Day but I whipped these up this past Friday and they came out so wonderfully that I couldn't not share it with you all (please ignore the English major using double negatives).

I pinned a recipe for Strawberry Mug Cake awhile back and I had the urge to test it out, and my roommate offered to pick the strawberries up for me while she stopped at Costco. Why I didn't realize that this would be entirely too many strawberries is beyond me, but now I was stuck with them.

So what do I do with the extra strawberries? Turn them into muffins of course!


Did that really surprise anyone? Other than the fact that the post has the word muffin in the name, probably not. I believe we've established I have a bit of muffin mania. It's quite alright, genius is often mistaken for madness.


I am also proud to say that these are entirely my own creation, which makes me even more excited to share it with you. The use of heavy cream gives the muffins a nice touch of sweetness along with a crumbly texture that is melt in your mouth yummy. The addition of white chocolate chips sure didn't hurt either.


These are great just as an any-day indulgence but with Valentine's Day swiftly approaching, I thought this would be great to share as a quick fix for a sweet gift for someone special.

In case your more in the Whoopie Pie mood for the holiday, check back Tuesday for Pink Velvet Whoopie Pies!

Happy Baking!


Strawberries 'n Cream Muffins Via Yours Truly
2 cups flour
1/2 cup sugar
1/4 cup vegetable oil
1 heaping cup chopped strawberries
1 egg
1 1/4 cup heavy cream
1 tbsp baking powder
1/4 tsp salt
3/4 cup white chocolate chips

1. Preheat oven to 350 degrees and line/grease one 12-cup muffin pan.
2. Sift together flour, sugar, baking powder, and salt in a large bowl. 
3. In a separate bowl, whisk together oil, egg and cream.
4. Add wet ingredients to dry ingredients and stir until just combined. Fold in strawberries and white chocolate chips.
5. Fill each cavity of the pan 3/4 of the way full with batter and bake at 350 for 20-25 minutes or until a toothpick comes out clean.

Thursday, January 26, 2012

Homemade Strawberry Pop Tarts

Hello there friends!

I know it's been so long - but I come bearing exciting news!

You can make pop-tarts at home!


This may/may not come as a shock to you, but the idea sounds pretty fantastic to me. My boss at work asked me to whip some up as a challenge to a fellow co-worker who claimed he could make them from scratch but had yet to do so (Pop Tart Showdown anyone?) He was even so nice as to pick up the major ingredients for me since I was snowed in this Saturday and kept from going the grocery store...

I guess someone really wants to try a homemade pop tart!

It turns out they are not too difficult to make (just a bit time consuming - so be prepared to be patient) and you can even pull a Sandra Lee and Semi-HomeMake it with pre-made pie crust. I opted for fresh pie crust since I had the time and I wanted to go all out for these babies. In retrospect, it would've saved me a good hour or two if I used the premade crust - if you plan on making alot of these (the recipe only yields about 7), I would suggest picking up a couple refrigerated doughs ahead of time.


So...not only is making your own pop tarts super fun (and impressive - seriously imagine telling your friends 'oh yeah I just whipped up some fresh, from-scratch pop tarts the other day...') it is also extremely versatile. Now that I know this works I can easily switch out the strawberry preserves for peach, blueberry, or even a brown sugar cinnamon filling! Possibilities = endless & delicious.


I hope you enjoy trying these out (if you have children this would be so much fun on a rainy Saturday) and be sure to keep an eye out for my next post on Nutella Brownies!

Happy Baking!

Homemade Pop Tarts Via Bake Me More

1 refrigerated pre-made pie crust OR 1 batch fresh pie crust (recipe follows)
1 medium jar strawberry preserves/jam (or any flavor of your choice!)
egg wash OR vanilla glaze
sprinkles (optional)

Homemade Pie Crust
1 1/2 cups flour
1/4 cup shortening
1/4 cup butter
1/2 tsp salt
3-4 tbsp cold water

1. Combine flour and salt. Add shortening and butter and cut into flour with pastry cutter or your fingers until consistency is coarse
2. Slowly add a tablespoon at a time of water until dough comes together and forms a ball

Vanilla Glaze
1 cup powdered sugar
milk (as needed)

1. Add powdered sugar to medium bowl. Add milk slowly (one tablespoon at a time) and combine until consistency becomes like very thick syrup.

Assemble Pop Tarts:
1. Roll out pie crust and cut into equal sized rectangles. Line out half the rectangles on a greased/lined cookie sheet
2. Spread a generous dollop of strawberry jam/preserves in center of rectange. Cover with another pie crust rectangle.
3. Use a fork to crimp edges all the way around. If not using glaze, brush lightly with egg wash
4. Bake at 450 for 7-8 minutes or until golden brown
5. Glaze and decorate if desired

Thursday, January 12, 2012

Strawberry Whoopie Pies

Hello all,

The return to winter weather (for me) is approaching quicker than ever, and I am so not looking forward to it. It has been an average of 70 degrees for my winter vacation, and the idea of bracing the average 35 degrees up in New Brunswick fills me with dread. With that said - the rest of my baking adventures until I leave will be delectable, fruity, and full of Spring/Summer fun.

After the huge success of the Strawberry Shortcake Muffins, I just had to see what else I could whip up with these amazingly juicy little fruit that have just come into season down here in Florida. I came across Strawberry Whoopie Pies on SweetPea's Kitchen and I knew I had to try it.


I always thought shortening was the key for Whoopie Pies, but apparently vegetable oil and some sour cream can go a long way. These are chewy, cake-y and full of fresh strawberry flavor. Although they are sort of, well, huge (she said heaping tablespoons...) it will keep me from eating all of them in one go; I hope.


I hope these remind you of summer as much as they do for me (I bet it would work with blueberries or raspberries as well!) and as always,

Happy Baking!


Strawberry Whoopie Pies 
slightly adapted via SweetPeasKitchen

3 cups flour
1 cup brown sugar
2/3 cup vegetable oil
1 cup finely chopped strawberries
2 eggs
1/2 cup sour cream
1 1/2 tsp baking powder
1 tsp baking soda
3/4 tsp salt

1. Whisk together flour, baking powder, baking soda, and salt in a medium bowl.
2. Combine oil and sugar, whisking until thoroughly incorporated. Whisk in sour cream and strawberries.
3. Whisk in eggs, one at a time, until incorporated. Fold in flour mixture in two batches; do not overmix
4. Cover and refrigerate for 1/2 hour
5. Preheat oven to 350 degrees and line two baking sheets with parchment paper.
6. Drop heaping tablespoonfuls of batter onto the baking sheets approx. 2 inch apart (to allow for spreading).
7. Bake at 350 for 10-12 minutes or until a toothpick comes out clean from one of the cookies.
8. Let cool on pan for 10 minutes then transfer to wire rack to cool completely.

Frost - Flip cookie upside down and place large dollop of Buttercream in center. Place another cookie on top and gently press to spread Buttercream to edges.


Strawberry Buttercream

1 cup softened butter
1 cup finely chopped strawberries
4 cups powdered sugar
1-2 drops red food coloring

1. Beat butter until fluffy, then add in powdered sugar. Slowly add in strawberries and food coloring and beat until frosting reaches uniform consistency.


Whoopie Pies on FoodistaWhoopie Pies