Showing posts with label cupcake. Show all posts

Thursday, September 13, 2012

Brownie Banana Bread Cupcake Blunder

Hello friends,

Let's get straight to it shall we? I am sad. Just when I thought I was getting into a groove, life decided to throw me a sucker punch in the form of this tantalizing recipe for Brownie Banana Bread Cupcakes.


My bananas were getting ripe. Too ripe. But I had read somewhere on the good old Internet that you can freeze black bananas until you are ready to bake with them.

Ask me if I remembered to thaw the bananas ahead of time.

Nope.

Did I remember to take butter out of the freezer?

Nope.

But I did not let any of this deter me, even though I probably should have just taken the hint. Fate was trying, most likely, to help me out; but stubborn little me really really wanted to try one of these cupcakes. I managed to get the skin off of the bananas, much like peeling a carrot, but then thought to microwave them to get them a little less, well, frozen.


I finally manage to get everything into the cupcake pans and it's so late that I think "just not frosting them would leave me with sweet muffins. No one will know the difference". But frosting would not have saved these sad, naked cakes. The added moisture from the microwaved bananas made me increase the cooking time, to the point where the brownie became non existent, dry, and crumbly, and there still were mushy sections of cake.


It's never a good sign when one must wrestle with the cupcake wrapper to get at the actual cake. Ugh.

I guess I am still trying to get my head in the game so to speak for my senior year of college. Coming back is always exciting, but it also tends to feel a bit like a slap in the face. Reading, studying, homework, part time job, running a student organization and blogging. What have I gotten myself into?

Well, next week there will be fudge. Fudge makes everything better, right?

Right.

So until next week,

Happy Baking!


Friday, August 3, 2012

DIY Vanilla Sugar Scrub

Hello friends,

If you love baking as much as I do, then you'll understand my need to bring it into every single part of my life. Baking, eating, and now smelling like a cupcake. Yes, you are still on the right blog. No, you did not misread the title. I plan on sharing with you the wonderful  secret I've learned thanks to sites like Pinterest.


You can make your own deliciously scented, economically awesome, body scrub. I have dropped at least $20-30 bucks on a precious jar of scrub from Sephora or Ulta, but no more! This recipe, including the glass mason jar I keep it in, comes in at roughly under $3 a batch.

Did I mention that you will have all of these ingredients already in the pantry? Oh and it's totally okay for sensitive skin. I break out even if the water is too hot in the shower, but this scrub leaves my skin baby soft and without a bump.


Here's our wonderful cast of characters: white sugar, brown sugar, vegetable oil, and vanilla extract. Feel free to splurge and pick up coconut oil or sunflower oil, but canola works just fine and does not have any unwanted smells, like olive oil. Also, you'll need the container you plan on storing the scrub in. I use a mason jar because I like the airtight seal and it's just super cute, but if you have kids or are afraid of shattered glass, just pick up a heavy duty tupperware container.


Fill your container with equal parts white and brown sugar, or as close as you can get. The great thing with this recipe is that it's pretty much adjustable to any kind of ingredients you have on hand. I even do all white sugar with fresh lemon zest for a to-die-for citrus scrub.


Pour out the sugars and mix them together until it looks like you have a bunch of beach sand. Pack the sugar back into your jar, then add about one tablespoon of vanilla extract and a few tablespoons of oil. Let the oil and extract seep into the sugar completely before adding any more oil. You want the oil to penetrate about 1/2 way down the sugar mixture.


Then turn it out one more time into a bowl and mix with your fingers until scrub comes together. When you wash your hands after this you will already begin to notice how awesome this scrub feels.


And that's it! Pack it back into your jar, screw on your lid and you're good to go. Want more scrub ideas? Here's some links with some great ideas for other scrubs that are great on your skin AND on your wallet.

DIY Citrus Salt Scrub
DIY Pumpkin Spice Sugar Scrub
DIY Beauty Tips (with Body Scrub Recipe)

And don't worry; I'll be back next week with a delicious cupcake I've been aching to try out from HowSweetEats.

Until then,

Happy scrubbing!

Monday, June 4, 2012

Portland, Maine - A Foodie Town After My Own Heart

Hello friends!

I've been so terrible with posting, but I just woke up from the most pleasant food coma ever. How was I induced into such a coma you may ask? It all started with a pleasant vacation to...


Maine!


Portland, Maine, and the surrounding small islands to be more specific. This little city stole my heart this past Memorial Day weekend when I journeyed there with my boyfriend, Josh, and his family. First we spent a day relaxing on Great Diamond Island then it was a fun-filled grub (and pub) crawl through Portland, but not before we enjoyed some fresh, from-scratch sticky buns, prepared with love by Josh's grandparents.


I will have to split this into two posts because I just couldn't help myself when taking photos. So today we will focus on, what else, the two out-of-this-world bakeries of Standard Baking Company and Two Fat Cats Bakery. Now I had already read about Standard in an article on Twitter about "Top Bakeries in the US", so I knew I was in for a real treat. In both taste and character it does not disappoint. With some of the friendliest staff to the most mind-blowing baguettes, I was swooning as soon as I stepped through the door.


From classics like baguettes, focaccia, and croissants, to delectable sweets like vanilla bean madeleines and morning buns with pecans - I just couldn't decide what to buy. I could have just bought one of everything, but I had many more food shops and restaurants to explore, and with my college student budget, choices had to be made. I went with a demi baguette and the vanilla bean madeleine, and I can see how the baguette was voted into that article in the first place. Hard, crusty exterior with a light-as-air interior that melts in the mouth. I am sadly wishing I had one right now as a matter of fact.


Where to next? Well, until recently, the sister bakery of Standard was Two Fat Cats. I heard that it was recently sold to another owner, but it was (according to any and everyone I encountered in my days there) a must-go-to in Portland. So off we trekked to see what Two Fat Cats had to offer...


Do you see those pies? It took all of my self control not to buy one (again - so many places to see, so many foods to eat!) but their scent left me feeling warm and cozy and wanting to curl up with a thick slice and a dollop of ice cream. But I had to buy something that could be eaten (without shame) all by myself, so I settled, as if settling were truly the right word, on this red velvet cupcake.


Note: I am not a delicate eater. I apologize if the way I dove into this cupcake upsets you, but this is how we eat cupcakes on sugar mountain; and I dare you to go into Two Fat Cats Bakery one day and see if you can leave without inhaling something in seconds. Moist and with the perfect amount of cream-cheese frosting - this cupcake lasted even less time than it appears in the photos. Ah, little cupcake, you never stood a chance.


I barely stepped into Portland before I became overwhelmed with just how much they love food there. Dare I say it, could I have found my dream city to retire to, where I can eat and enjoy food to its fullest potential without surprising and/or shocking my peers? The dedication to good food continues on Wednesday, when I share with you gourmet groceries, crazy popcorn flavors, and...

mashed potato bacon pizza.


Until Wednesday my fellow foodies!

~Jess

Monday, April 16, 2012

Nutella Filled Chocolate Cupcakes

 Hello all,

I think I've become obsessed with stuffing sweet treats with ooey gooey fillings. The Nutella-Stuffed Sugar Cookies, the Marshmallow Fluff-Filled Banana Split Cupcakes...it was only a matter of time before we had Nutella filled, Nutella Frosted, Chocolate Cupcakes.


Sigh. These made my week that much less stressful. With every bite comes an immediate relaxing sensation that everything: papers, exams and all, are going to work out fine.

I think we all need to stock up on these cupcakes.


They are really quite simple and easily adaptable to your needs. First, start out with any basic chocolate cupcake. You can whip up your favorite from-scratch recipe like I did, or even whip up a box mix. This is especially helpful for those like my nana with Celiac, who can now happily pick up gluten free cake mixes (and Nutella is gluten free!).

Once they are baked and cooled, cut out a decent-sized hole in the center of the cupcake. Proceed to filling said holes with lots of Nutella.

Are you interested yet?


I thought so. Now just whip up this amazing Salted Nutella Buttercream from MyBakingAddiction, pipe it on whichever way you please and ta-da!

Chocolatey-hazelnut perfection.


I hope these are as stress-relieving for all of you as they are for me. As I run this gauntlet otherwise known as upperclassmen college papers and exams, I know I will be sneaking one (or maybe five) of these cupcakes to keep me going!

Happy Baking!

Salted Nutella Buttercream By MyBakingAddiction 
(enough to generously frost 24 cupcakes)

1 cup (2 sticks) unsalted butter, softened
1-13oz jar Nutella
8-10 cups powdered sugar
1 tbsp vanilla extract
1/4-1/2 cup milk

1. Place butter and nutella in large bowl and beat until well incorporated.
2. Add powdered sugar, a few cups at a time, and beat until stiff frosting comes together.
3. Add vanilla extract, salt, and tablespoonfuls of milk until desired consistency is reached.

Wednesday, April 4, 2012

Cupcake Challenge Day 2: Vanilla Chai

Hello friends,

So remember when I mentioned that this month would be a cupcake "challenge"? I originally employed that word because it was exciting and fun, but apparently I was quite accurate with the literal meaning of "challenge"....

Cupcakes are supposed to be stress-free, at least in my opinion they are.

Yet, as I type that I realize I spent 9 hours one day last April making over 1000 cupcakes with the baking club, and in reality that was one of the most stressful experiences ever. I must have missed the memo: cupcakes are now "challenging". Be warned.

I learned this yesterday as I attempted to bake up Vanilla Chai Cupcakes. I followed this recipe to a T but sadly, in the words of my favorite European judge Florian on Cupcake Wars: "this cupcake, it did not work for me."

The recipe said to only fill the liners with 2 tablespoons of batter. So first batch naturally came out like so:


Why did I think it was going to rise more? Who knows. So the next batch I filled it with 1/4 cup, my default when filling cupcake liners. Did they rise more? Yes, of course. Were they any better?

Sadly, no. Unfortunately it just tasted like a lot of ginger, and the consistency was chewy, sticky, and overall disappointing. It's worth trying again (I am a big fan of Bakingdom - anybody who shows me how to make homemade butterbeer definitely deserves another shot in my kitchen). But I have the sinking feeling that these will not be fought over at my workplace as in precious times...


Well, I didnt want to show you these, perfectionist that I am, but this IS about the experience, and not all of them can be as stellar as I'd like them to be. Challenge doesn't always mean success.


I know I usually include the recipe here, but I linked it above and instead I thought I'd share with you all a few links that I find really helpful when baking up cupcakes:

1. Missing an ingredient? Check out Diana's Desserts "Ingredient Substitutions" page for a whole slew of ideas on how to substitute ingredients for items you may already have in your pantry. After stumbling upon this site I never bought store-bought buttermilk again.

2. Basic Cupcake Tips from SomewhatSimple. She has a great list of tips for cupcake baking in general, including how to fill you piping bag, how long to bake cupcakes for, and what kind of liners to use with which kinds of cake.

3.  Basic Royal Icing Recipe from Sweetopia. This is an adorable illustration of how to make Royal Icing. Informative, quirky, and cute, it's a great printout to keep in your recipe book (or to repin onto one of your Pinterest Boards!)

That's all for now. I have (hopefully) something cute in the works for Easter later this week, so check back later for more cupcake concoctions and sweet tips.

Happy Baking!

Sunday, April 1, 2012

Month of Cupcakes Kickoff

Hello all,

Do you ever get hung up on making a decision?

I do. I hate making decisions. Yes, I know, terrible to admit but I positively loathe having to choose; not because I dislike being in charge (trust me, not a problem) but in reality because I love variety and never know what I want. What to have for dinner, what flavor of coffee I want, whether I want to study procrastinate on Pinterest or FoodGawker...the list goes on and on.


For example, I had decided (or so I thought) that I would do an April Cupcake Challenge here on the blog. Simple enough decision, now the only problem lay in where to obtain the recipes from. Do I go Julie and Julia on all of you and get a cupcake book? Or can I just pick my most favorite, most mouthwatering cupcake posts from some of the best baking blogs out there? OR do I just not do cupcakes at all because I can't decide between my first choice and second choice?

Now you see -  there's too much room to over-think it. Well it's your blog silly, my mind says to itself Just do you.

'But what does that even mean??' I ask my mind back. Then I realize I'm talking to myself inside my mind and it's very close to becoming talking to myself outside of my mind. Not an attractive feature while walking to class, let me tell you.

Well, just like avoiding decisions I am going to avoid that question too, for now. Right now, I am seriously in the mood for some cupcakes, and I think a whole month of them sounds just delightful.

Don't you?

I'm so glad you agree! So take this as a challenge, or just a month brimming with delicious baby cakes, but cupcakes will be the name of the game for the month of April here on Sugar Mountain.

Phew. Decision reached.


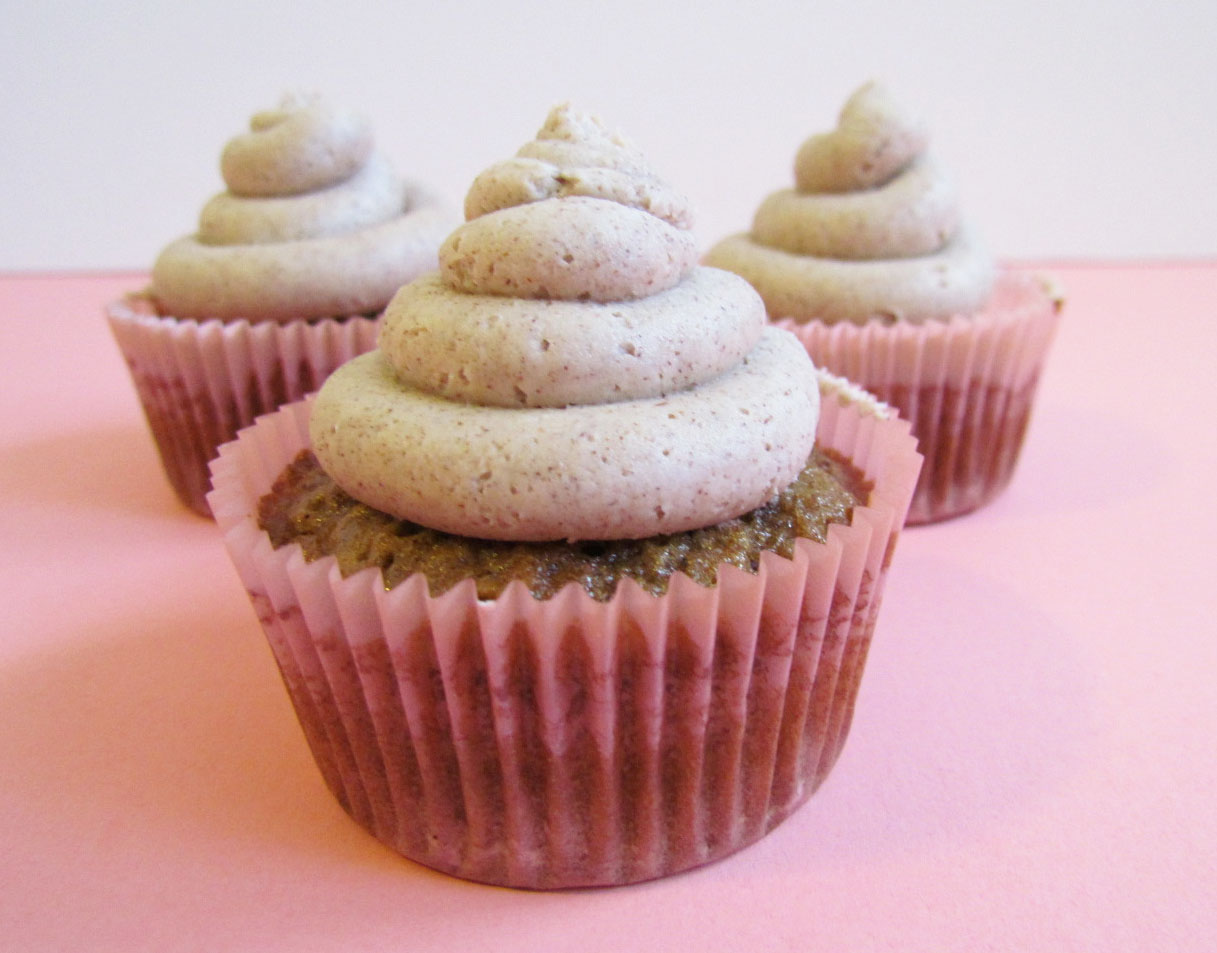
And to kick things off: Mocha Coconut Frappuccino Cupcakes! This recipe has been on my "To Bake" list for ages, and now that I've made (and eaten) an unhealthy amount of them, I can say that it was worth the wait, and that I most likely will not wait long until I make them again. They are that good.


During this month I'll also share links I've found with tips on cupcake baking, decorating, storing, etc.

If you want to join in on my month of cupcakes, just comment here on the post, sharing a link to your blog and letting me know if you'd like me to share your photos here on mine. That means all your posts in April must  be cupcake related, and I only ask that if you do want to get involved, to please link back to this post so that more bloggers can get involved and share their own crazy cupcake obsession.

Happy Baking!

Mocha Coconut Frappuccino Cupcakes Via How Sweet It Is 

1cup + 2 tbsp flour
1/4 cup cocoa powder
3 tbsp instant coffee
1/2 tsp salt
1 1/4 tsp baking soda
3/4 cup sugar
1 egg
2 tsp vanilla
3/4 cup coconut milk
2 tbsp sour cream
1/2 cup melted butter, cooled
1/2 cup chocolate chips

1. Preheat oven to 350 degrees and line one 12-cup muffin pan with cupcake liners.
2. Sift together flour, cocoa powder, coffee, salt, and baking soda in a medium bowl. Set aside.
3. In a large bowl whisk together egg and sugar until you reach a smooth consistency with no lumps. Beat in vanilla, coconut milk, and melted butter.
4. Add dry ingredients to wet ingredients, mixing until just combined and batter is smooth. Stir in sour cream. Fold in chocolate chips.
5. Use a 1/4 cup measuring cup to fill cupcake liners with batter. Bake at 350 for 15-18 minutes or until toothpick comes out clean

Coconut Cream Frosting:

1cup softened butter
3 2/3 cups powdered sugar (more may be needed)
1 tbsp vanilla extract
1-2  tbsp coconut milk
1/2 cup sweetened, shredded coconut

1. Beat butter until light and fluffy, then begin to beat in powdered sugar, one cup at a time. Beat in vanilla extract and teaspoonfuls of coconut milk until desired consistency is reached. Stir in sweetened shredded coconut and beat until smooth.

1/2 cup toasted coconut (*toast for 10 minutes at 350 degrees until golden - stirring often)

Mocha Coconut Drizzle:

2/3 cup powdered sugar
2 tsp cocoa powder
1 tsp instant coffee powder
1-2 tsp coconut milk

1. Sift together sugar, cocoa powder and instant coffee in small bowl. Add coconut milk and stir. Continue to stir until thick glaze comes together, adding splashes of coconut milk if necessary.

Monday, March 5, 2012

Key Lime Pie Cupcakes

Hello all!

This will be another quick post as I am still running the gauntlet that is Rutgers Midterms. Sigh, why can't I just get graded for how delicious these cupcakes are?


Key Lime Pie Cupcakes: what a thought. Now I am always a bit disappointed with citrus-y cupcakes, because the tartness from the fruit just isn't there. So I was pleasantly surprised when these cupcakes: moist, dense, and sweet, were also so full of lime flavor that I almost puckered a little when I ate one. Almost.