Showing posts with label cake. Show all posts

Tuesday, October 16, 2012

Caramel Apple Rice Krispie Treats

Hello friends!

So last week I know I told you there would be whoopie pies...but they ended up being such a massive failure that I swiftly spiraled into "woe is me" world and trust me, it was not pretty.

I am saving you from what was the worst pity party blog post ever.

So when life gives you the whoopie pie blues, it means it's time to get back to basics with one of my favorite fixes: rice krispie treats

Boring, you say? Too basic perhaps? But these are awesome and covered in caramel and taste like apple cake.


So, let's call it back to basics but with an upgrade. :)

I first realized you could mix cake mix into rice krispie treats when Rutgers Student Bakers held the biggest, most badass bake sale Rutgers University has ever seen. For detials check it out here. One of the more exciting items we had were red velvet rice krispie treats, courtesy of cocoa krispies and some red velvet cake mix.

But these are warm, spicy, cozy, all those wonderful adjectives I keep utilizing in my October posts.


It took a whole lot of self restraint to not eat this entire gooey caramel hot mess straight out of the pot. But patience is a virtue, and one that was happily rewarded in a few hours. Not to mention the treats doubled as a fragrance enhancer for my entire apartment.

I get to stuff my face AND my apartment smells like caramel cake. I'm feeling better already.

So if you're having a tough day, or this week appears to be a longer one than usual, spend a few minutes mixing these up. Take your mind off you work for a few moments, and reward yourself for all the hard work you do with a little Caramel Apple Rice Krispie Treat.

Happy Baking!


Caramel Apple Rice Krispie Treats Via Mother Thyme

12 tbsp butter
1 10oz bag mini marshmallows
1 1/2 cups Caramel Apple Cake Mix
1 tsp vanilla
6 cups rice krispies cereal

caramel sauce, prepared as per back of package instructions (comes with cake mix)

1. Melt butter in large pot over medium/high heat. Add marshmallows and cook until smooth.
2. Whisk in vanilla and cake mix until well incorporated. Remove from heat.
3. Stir in rice krispies cereal.
4. Pour half of mixture into a foiled and greased 9x13 inch cake pan. Drizzle half the prepared caramel sauce over top. Cover with rest of rice krispie mixture. Drizzle rest of caramel sauce over top.
5. Let cool for approximately 2 hours, then cut into squares and serve.

Thursday, September 13, 2012

Brownie Banana Bread Cupcake Blunder

Hello friends,

Let's get straight to it shall we? I am sad. Just when I thought I was getting into a groove, life decided to throw me a sucker punch in the form of this tantalizing recipe for Brownie Banana Bread Cupcakes.


My bananas were getting ripe. Too ripe. But I had read somewhere on the good old Internet that you can freeze black bananas until you are ready to bake with them.

Ask me if I remembered to thaw the bananas ahead of time.

Nope.

Did I remember to take butter out of the freezer?

Nope.

But I did not let any of this deter me, even though I probably should have just taken the hint. Fate was trying, most likely, to help me out; but stubborn little me really really wanted to try one of these cupcakes. I managed to get the skin off of the bananas, much like peeling a carrot, but then thought to microwave them to get them a little less, well, frozen.


I finally manage to get everything into the cupcake pans and it's so late that I think "just not frosting them would leave me with sweet muffins. No one will know the difference". But frosting would not have saved these sad, naked cakes. The added moisture from the microwaved bananas made me increase the cooking time, to the point where the brownie became non existent, dry, and crumbly, and there still were mushy sections of cake.


It's never a good sign when one must wrestle with the cupcake wrapper to get at the actual cake. Ugh.

I guess I am still trying to get my head in the game so to speak for my senior year of college. Coming back is always exciting, but it also tends to feel a bit like a slap in the face. Reading, studying, homework, part time job, running a student organization and blogging. What have I gotten myself into?

Well, next week there will be fudge. Fudge makes everything better, right?

Right.

So until next week,

Happy Baking!


Tuesday, August 7, 2012

My 100th Blog Post & Oatmeal Chocolate Chip Cupcakes

Hello friends!

I still can't quite wrap my head around the idea that this is my 100th post on OnSugarMountain. It's been a little over a year since I started this baking blog, and it's taught me so much.

Some quick tidbits I've learned about baking:

1. Cupcakes are not always easy. Do not look down upon a cupcake. They can be quite awesome and take more work than you might imagine. See Banana Split Cupcakes & Homemade Hostess Cupcakes


2. Stuffing anything with nutella is an AWESOME idea and we should all try to do it as often as we can. See Nutella Stuffed Sugar Cookies & Nutella Stuffed Cupcakes


3 .Muffins are NOT just ugly cupcakes. Muffins can be sweet little mouthfuls of heaven without any frosting. See Strawberries & Cream Muffins


4. Eggless Cookie dough exists, can be eaten without getting sick, and is freaking fantastic. See Cookie Dough Topped Brownies


5. Baking can bring people together in ways that nothing else can. We can make friends, stuff our faces, and do it all while helping out those less fortunate than us.


On a larger scale and with the risk of sounding philosophical, this blog and all the adventures that accompany it led me to learn a great deal about myself. I know I said this blog was to document my adventures in baking until I opened up a bakery of my own, but I've realized something; the part I love the most about baking, eating, food, all of it, is the experience, and I could never turn it into a job that I'll eventually resent. Seeing people's faces light up when I bring in brownies to work, or hearing a collective "mmmm" as everyone takes a bite, I know I've brightened up their day, if only for a moment. I love that.

I love it so much that turning into something I will stress about is not an option. I could never risk turning baking into an activity I look at with exhausted eyes and think "I so do not want to bake today." Food, for me, will always be about the experience, about enjoying every single morsel of a meal and most importantly, sharing it with friends and family.


So opening my own bakery may not happen, but that doesn't mean I can't change the way we all have come to see food. How can I do this you ask? By doing exactly what I am doing right now. Blogging. Writing. Sharing. Doing. Food is such an intrical part of our lives but we've let it fall to the wayside in lieu of other "more important" things to stress about, such as our jobs, the economy etc etc. OR we stress about food too much and jump on every dietary bandwagon that rears its ugly head.

I want to remedy this. I want people to experience the love that can come from food. Our lives, now more than ever before, need balance. What better way to balance the stresses of our everyday lives than relaxing to come together around a table?

And so, drumroll please....

I'm starting a new blog this September!


On Sugar Mountain will still be up and running twice a week, but I hope that you will will come check out my new blog, The Foodie Files, where I hope to show people just how important food is to each and every one of us.

Phew. Lots of sharing going on in this post. Now it's finally time for the food!


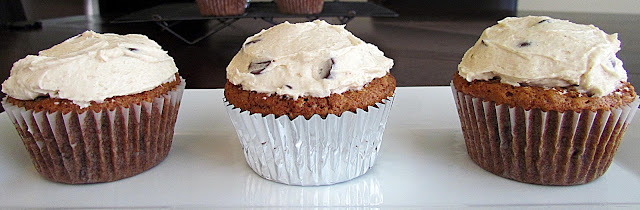
Oatmeal Chocolate Chip Cupcakes. Make them. You'll love them. I promise. It's like a chewy oatmeal cookie, riddled with chocolate chips, baked into tiny cakes then covered with a mind-blowing cinnamon sugar frosting. Give one of these to a new acquaintance and I'm betting you two will be bffls in no time.

Lastly, I want to thank each and every one of you who read my blog. It makes my day to see comments posted about what I bake or a new follower pop up on my Dashboard. I've met wonderful people in creating this blog and I hope to meet so many more.

Until next time,

Happy Baking!


Oatmeal Chocolate Chip Cookies Via HowSweetEats

3/4 cup brown sugar, loosely packed
1 egg
1/2 cup butter, melted and cooled
2 tsp vanilla
1/2 cup oats
1 1/4 cup flour
1 1/4 tsp baking soda
1/4 tsp cinnamon
1/4 tsp salt
2 tbsp milk
1/2 cup chocolate chips tossed in a sprinkle of flour

1. Preheat oven to 350 degrees and line one 12-cup muffin pan with liners.
2. Beat egg and sugar until smooth, then beat in melted butter and vanilla.
3. Add oats, flour, baking soda, cinnamon and salt to egg mixture and stir until incorporated. Stir in milk then fold in chocolate chips.
4. Pour 1/4 cup of batter into cups then bake at 350 for 16-18 minutes or until tops spring back lightly when touched. Let cool in pan for 5 minutes before removing to wire rack to cool completely.

Cinnamon Sugar Chip Frosting

1 cup butter, softened
2 cups powdered sugar
1/2 cup brown sugar, loosely packed
1/4 tsp cinnamon
1 tbsp vanilla
1/3 cup chocolate chips
1 tbsp milk (optional)

1. Beat butter until light and creamy, then slowly beat in powdered sugar.
2. Add brown sugar, cinnamon and vanilla and beat until fluffy. Add milk if frosting is too thick.
3. Fold in chocolate chips.

Tuesday, July 17, 2012

Oreo Explosion Cupcakes

Hello friends,

What is it about Oreos that makes us all smile? Of course they're yummy, chocolatey (shockingly even vegan) but this little cookie manages to make my day that much better no matter how I am feeling. Example number one: The Oreo Cheesecake Cookies from last Friday. Stress + Jess = cranky mess. Stress + Jess + OREOS = no more stress. It's like magic, except if it were truly magic there would be no calories involved either. Maybe if I only eat six it won't matter...


or maybe I just won't look at the nutrional facts on the box for awhile.

Today brings about example number two in the Oreos for a Less Stressful You project. Yes, I just came up with that right now as an excuse to eat way more Oreos than is nutritionally suggested. Don't judge me; I know you're all thinking it sounds like a great idea that should be supported nationwide.


Now these aren't just any Oreo Cupcakes. These are cupcakes with:

a) half an oreo on the bottom
b) oreo chunks suspended throughout vanilla cake
c) cream cheese frosting
d) oreo crumb topping
e) all of the above


I will admit I was just a tad worried that the ratio of Oreo to Cake was too high, but then I reminded myself that there is no such thing as too many Oreos. Ever. I can feel the stress floating away already. Do you have a favorite Oreo recipe? Does it help you de-stress on those day when nothing else can? If not, find one! I promise you, nothing can ease a stressful mind like an Oreo, or more accurately a cupcake overflowing with Oreos

Happy Baking!

Oreo Explosion Cupcakes Via Annie'sEats

1/2 cup butter, softened
1 2/3 cup sugar
3 egg whites
2 tsp vanilla
2 1/4 cups flour
1 baking powder
1/2 tsp salt
1 cup milk
24 oreo halves
20 coarsely chopped oreos

1. Preheat oven to 350 degrees and line 2 cupcake pans with paper liners. Place one side of an Oreo cookie (preferably with the cream still attached) in the bottom of each liner.
2. In medium bowl sift together flour, baking powder and salt. Set aside.
3. In large bowl cream together butter and sugar until light and fluffy, then beat in egg whites, one at a time, until fully incorporated. Beat in vanilla.
4. Beat in 1/3 of the flour mixture on lowest speed until just incorporated, followed by 1/2 of the milk. Repeat, beginning and ending with the flour, beating until you reach a uniform consistency.
5. Gently fold in chopped Oreos.
6. Equally divide batter amongst cupcake lined pans and bake at 350 for 18-20 minutes, rotating the pan once during baking. Cupcakes are done when a toothpick inserted in the center comes out clean
7. Let cool in pan for 5 minutes before removing to cool completely on wire rack.

Cream Cheese Frosting

8 oz cream cheese
6 tbsp butter
1 tbsp vanilla
4 cups powdered sugar
2 tbsp heavy cream
Oreo Crumbs
1. Cream butter and cream cheese until well blended. Beat in vanilla, followed by powdered sugar.
2. Beat in heavy cream on low at first until fully incorporated then on medium/high for roughly 3-4 mintues until frosting is light and fluffy.
3. Pipe frosting onto cooled cupcakes, then sprinkle with Oreo Crumbs.

Tuesday, July 10, 2012

Disastrous Donuts

Friends,

I am still in shock. A mad attempt to fill donut cavities with a would-be Cinnamon Roll Donut Recipe turned quickly into smoke and cinnamon topping oozing out of my precious BabyCakes Donut Maker.


The Horror! The Absolute Donut Horror!

Sigh. Fortunately no one (other than my appetite, and that ever-sensitive ego) was hurt by this event. As much as I love my little Donut Maker, I have come to the realization that not every donut can be made in it; some require the stability of a donut pan. See, with a donut pan, one can move calmly and easily with the preparation of a donut batter. The pan is not hot to the touch, like the donut maker will be once it has preheated and stares at you mockingly, just ready to burn you and/or your precious donuts.


For multi-step donuts, as these Cinnamon Roll Donuts were, there is no mad dash to fill the donut pan with one liquid before quickly grabbing the second to pour over it. Over filling a donut pan just results in ugly, misshapen donuts, which can most likely be fixed by a little knife-work and a generous dollop of frosting or a simple glaze. Over filling in the donut maker means be prepared to witness smoke and oozing liquids that result in over-baked donuts, and a sad baker.

Baking, for me, should be relaxing. It's fun. It's delicious, and it brings smiles to the faces of the friends I share my sweets with each day. This was neither fun nor delicious, and stamped quite the unattractive scowl on my face while I scraped burnt cinnamon sugar off the Donut Maker.

Lesson Learned? Absolutely. The donut maker may sound like a shortcut, but it's not one that's actually going to alleviate stress or result in a better end-product. Take the plunge; invest in a few multi-sized donut pans, and bake away. I know I will.

Until next time,

Happy Baking!

Wednesday, May 23, 2012

Red Velvet Muffins

Hello all!

I know it's been almost a week since I last posted but I have been busily preparing for a VACATION! Now I know what you're thinking: "Isn't she already on summer vacation?" Technically, yes, but this is a vacation I have been looking forward to for years since the last time I traveled. I get to journey with my boyfriend and his family up to Maine for Memorial Day weekend...

and oh, did I mention we are staying on an island off the coast of Maine? My boyfriend's family has owned a home on Great Diamond Island for generations, where the homes have names instead of numbers (which is awesome in and of itself). Beautiful, quiet, serene: this is my kind of island. Not to mention I fell in love with the city of Portland last time I visited there; great food, cute shops, movies for $5...and of course the best lobster around.

The only negative is that his grandparents' home (which is where we are staying) does not have internet access, so I will be posting all of the lovely vacation photos once I return after Memorial Day. With that said, let me share with you one of my newest creations in my quest for baking fame. Hopefully these will hold you over until I return.

I give you....


The Red Velvet Muffin

Now I'm sure I am not the first one to think up a red-velvet-inspired muffin, but I have to say I am pretty darn impressed with how these came out. Bits of white chocolate midst a perfect scarlet hue, and a cake-like texture with just a slight hint of cocoa flavor; I am lovin' these muffins. True, I love almost all muffins, but there is just something purely wonderful about seeing your own idea transform into a successful sweet treat.


I hope these inspire you to create one of your own decadently delicious muffins, or to just test these out to share with friends. These are definitely the way to go if a full slice of red velvet cake seems over-the-top.

Well, I am off to the lovely coast of Maine; enjoy your Memorial Day and I will be back before you know it!

Happy Baking!


Red Velvet Muffins Via Yours Truly

2 cups flour
1/2 cup sugar
1/4 cup vegetable oil
1/2 cup buttermilk
1 egg
1 tsp vinegar
2/3 cup white chocolate chips
2 heaping tbsp cocoa powder
1/2 tsp baking soda
1 tsp baking powder

1. Preheat oven to 350 degrees and grease one 12 cup muffin pan with cooing spray
2. Combine flour, sugar, cocoa powder, baking powder, baking soda, and white chocolate chips in a medium bowl.
3. In a separate bowl, beat together egg, oil, buttermilk and vinegar. Quickly pour wet ingredient mixture into dry ingredient mixture and stir with large wooden spoon until just combined. Do not overmix.
4. Fill muffin cups 2/3 way full with batter and bake at 350 for 18-20 minutes or until toothpick comes out clean.
5. Let cool 5 minutes in pan before removing to wire rack to cool completely.
3. In a separate bowl

Tuesday, May 15, 2012

Luscious Lemon Loaves

I know I've been so good about avoiding alliterations (oh there I go again) but sometimes I just can't help myself. But now that you've read luscious lemon loaves, aren't you intrigued to know more?


At any rate I hope so because that's what I am focusing on today. This past Sunday we celebrated Mother's Day, my boyfriend's 21st birthday, and his brother's confirmation all in one shot. I baked these loaves and they turned out to be a  huge hit: one standard-sized loaf for my boyfriend's mother, and a baby loaf for the rest of the guests.


Making smaller loaves also aided me in feeling less guilty about the sheer decadence of this recipe. I know pound cake received its name from the ingredient list of a pound of each sugar, eggs, flour, and butter, but wow did I feel guilty when I dropped the contents of a 1 lb box of butter and 8 whole eggs into my mixing bowl.


Oh and did I mention that it gets a coating of lemon syrup and lemon glaze? 

Hence the term luscious. The syrup seals in the moisture and the glaze sets it right over the top. With a dozen fresh lemons, tons of butter and sugar, how could these have possibly turned out badly?


I'd love to try this out with the substitution of fresh strawberries or blueberries, or any fresh fruit for that matter. Fruit and cake, as long as it's not fruitcake always receive an A+ in my recipe book.

At this point you may be asking yourself "how do you top luscious lemon loaves?"

Answer: White. Chocolate. Filled. Snickerdoodles.

Keep an eye out for them and more coming up On Sugar Mountain!

Happy Baking!


 Luscious Lemon Loaves Via Glorious Treats
1 1/2 cups cake flour
1 1/2 cups all purpose flour
2 tsp baking powder
1/4 tsp baking soda
1 tsp salt
2 1/4 cups sugar
8 eggs
1/4 cup grated lemon zest (4 lemons)
1/4 cup fresh lemon juice
2 cups melted butter, cooled
1/2 cup sour cream
2 tsp vanilla

lemon syrup:

1/3 cup sugar
1/3 cup fresh lemon juice

lemon glaze:

2 cups powdered sugar
1/4 cup +1 tbsp fresh lemon juice

1. Preheat oven to 350 degrees and thoroughly grease 2 9x5 loaf pans (or mini pans) with cooking spray.
2. In a large bowl, beat together sugar, eggs, lemon zest and juice. Beat in sour cream and vanilla until just incorporated.
3. Sift together flour, baking powder, baking soda and salt in a separate bowl.
4. Use a large spoon or spatula to fold dry ingredients into wet ingredients, mixing until just combined.
5. Pour into prepared pans and bake at 350 for 20 minutes, rotate pans, then at 325 for an additional 30 minutes. Cakes are done when toothpick comes out clean.
6. Let cakes cool while preparing syrup and glaze.

7. Lemon Syrup: Add lemon juice and sugar to small saucepan and bring to a boil over medium heat. Let boil for three minutes. Remove from heat until ready to use.

**While cakes are still slightly warm, poke tops and sides with a toothpick. Brush liberally with lemon syrup.**

8. Lemon Glaze: Whisk together powdered sugar and lemon juice until thick syrup forms, using a little more juice if needed to adjust consistency.

**After cakes have soaked in syrup, drizzle glaze over top**

Wednesday, May 9, 2012

Birthday Cake Fudge

Hello all,

I told you I had to satisfy all the craving that have built up since I hurt my leg, and I have to amdit that after all of the sweets at Rutgers Day, I was regretting not taking any fudge home at the end.


I mean seriously, who doesn't love a giant piece of fudge?

Rutgers Student Bakers' favorite fudge is a cookies 'n cream recipe, but I wanted to try one I've had pinned on my Pinterest boards for months: birthday cake flavored. Yum.

So I finally got myself to stop drooling over my keyboard and get to work. I even had this great idea to use one of these pans:


to make equally-sized, easy-to-make fudge pieces. It's actually a silicone brownie pan from Wilton but I'm sure they won't mind if I MacGuyver it to my own delicious purposes.

I have to admit though, I do wish I had tried this one out with the baking club, or at least with a buddy, When she writes to "move quickly", she's not kidding. This fudge started to harden as soon as I turned off the heat. Attempting to turn half of it blue was a bit too much for me, but I managed to get it all into the pan and covered with, what else, rainbow sprinkles.


Phew. Now the good news is that my idea worked and the little bits of fudge came out perfectly from the silicone pan, and are adorable. The bad news? What the kitchen looked like minutes after I got all of it into the fridge to cool.


I've never seen so many dirty pots/pans/silverware. Sigh. It's times like these when I wonder what I would give to have a dishwasher up at college.

But after I salvaged the kitchen I rewarded myself with a taste, and it was like smooth, creamy, sugary perfection. I could've used even more cake mix in the recipe but really, these are quite addicting as is.


These would be a fabulous birthday gift for anyone with a sweet tooth. Or, you know, for yourself...it's someone's birthday somewhere out there...

Happy Baking!


Birthday Cake Fudge Via Mrs. Bettie Rocker

3 cups sugar
1 1/2 sticks butter/margarine
1 (5oz) can evaporated milk
1 (7oz) jar Marshmallow Fluff
1 (12oz) bag white chocolate chips
1/4 cup yellow cake mix powder
1 tsp vanilla
blue food coloring (optional)
rainbow sprinkles (optional)

1. Grease/foil one 8in or 9in square baking pan, or use a silicone baking pan greased with cooking spray.
2. Add margarine, sugar, and evaporated milk to a large saucepan. Bring to a boil and let boil for a full 4 minutes. Remove from heat.
3. Add fluff, white chocolate, cake mix, and vanilla, and stir continuously until all the chocolate has melted and the consistency is uniform.
4. Moving quickly, pour half of the fudge into a heatproof bowl and dye it blue (or whatever color you want).
5. Fill pan with blue fudge first, then the remaining white fudge on top, pulling a knife through to marble (if you want, I always like layers.) 
6. Cover top of fudge with sprinkles and let cool to room temp before storing in fridge for 2 hours to harden.

Monday, May 7, 2012

Red Velvet Cake Donuts

Hello friends!

I am finally back in the kitchen whipping up sweet treats to share with you. It took so much self-control to stay off my leg when I had some serious cravings last week, but now I plan to satisfy all of those cravings in the next few posts.

First, a few thoughts on my month of cupcakes challenge. I have learned that, quite honestly, doing an entire month of one type of baked good is not my thing. I am pretty much cupcake-d out...Forever. Or at least for a few weeks.

So with that in mind, naturally the craving I had for red velvet cake was not going to happen if it came out of my kitchen. One week later though, I found myself in the kitchen baking up red velvet...


donuts.


You really didn't think it was going to be another cupcake, did you?

Oh how I love donuts, especially the baked kind which leave me less guilty than their (in my opinion) more delicious yet more terrible for you fried counterparts. Trust me, I'd go for a Krispy Kreme over a baked-cake donut if given the chance, but I can eat more of these delectable donuts without feeling quite so bad about eating them.


These came out absolutely wonderful and right on par with the red velvet flavor I was craving so badly. Think of these as red velvet cake on-the-go! Add some fresh vanilla frosting and you are set.

Happy Baking!

Red Velvet Cake Donuts slightly adapted from Taste&Tell

2 1/4 cups flour
1 tsp baking soda
1 tbsp baking powder
1/2 tsp salt
1 egg
3/4 cup sugar
2 tbsp melted butter
3-4 tbsp semisweet chocolate chips, melted
1/2 cup buttermilk
red food coloring

1. Preheat oven to 350 degrees and grease donut pan(s) with cooking spray. Sift together flour, baking soda, baking powder, and salt in a medium bowl.
2. In a separate bowl, beat together egg and sugar until light and smooth.
3. Beat in melted butter and chocolate chips, then slowly beat in buttermilk.
4. Gradually add flour mixture to egg mixture, stirring until just combined.
5. Fill donut pan cavities 2/3 full with batter (will be very thick, piping it in might be easiest) and bake at 350 for 11-13 minutes or until they spring back lightly when touched.

Vanilla Frosting:

1/4 cup (1/2 stick) melted butter, cooled slightly
1 1/3 cups powdered sugar
1 tsp vanilla
1-3 tbsp warm water

1. Add butter and vanilla to medium bowl. Gradually whisk in powdered sugar.
2. Use tablespoonfuls of warm water to achieve desired consistency.
3. Dip donuts in frosting, then pick up, allowing excess to drip off. Cover with sprinkles or smooth out with spatula.