Wednesday, August 15, 2012

Homemade Red Lobster Biscuits

Hello friends!

I know; it's been so long. I apologize but it's been a bit hectic here and I've succumbed to some laziness when it comes to the kitchen. But this will have been worth the wait; I promise. I bring you a recipe I've discovered online, for the Red Lobster Cheddar Bay Biscuits that I know you all crave the way I do every time you see their commercials.

Yes, my friends, they can be made at home with a whopping 5 ingredients and under 30 minutes. We must share this news with the world!


Here's your major cast of characters: Bisquick, cheddar cheese, and garlic powder. Mix these together with some milk and that's it on the biscuit end of the equation. The simplicity is absolutely mind-blowing; how did we never discover this sooner?


Into a 400 degree oven they go for about 10 minutes, and while they do you whip up a magical concoction of melted butter, oregano, and garlic salt. Take the biscuits out....


brush with butter mixture, then back in the oven they go for another 5-6 minutes.

And that's it.

Yes. Really. That's it.


Oh, and ready for this? Not only do they taste just like Red Lobster's infamous biscuits, because they are made with Bisquick this recipe can be converted into a GLUTEN FREE CHEDDAR BAY BISCUIT. No longer do those with the dreaded allergy have to sacrifice the taste of these biscuits. Just pick up the gf bisquick mix, and keep everything else the same. It's that simple, that wonderful, and that delicious.


These are my last two weeks with the family so I will admit posts will be fewer and far between for awhile. Once September rolls around though and I'm back at Rutgers I'll be sharing sweet treats with everyone I meet and I'll be sure to share them here, as always, with you. :)

Happy Baking!


Homemade Red Lobster Cheddar Bay Biscuits Via JoyfulAbode 

2 cups Bisquick Mix
1 1/2 cups shredded cheddar cheese
1 1/2 tsp garlic powder
2/3 cup milk

2 tbsp melted butter
2 tsp oregano
1 tsp garlic salt

1. Preheat oven to 400 degrees and grease one baking sheet with cooking spray
2. Stir together bisquick, cheese, and garlic powder in a medium bowl. Stir in milk, using hands if necessary. Mixture will be very thick and sticky. This is okay.
3. Drop large dollops of batter onto prepared baking sheet. Bake for 10 minutes in preheated oven.
4. While biscuits are baking, stir together melted butter, oregano and garlic salt. Remove biscuits from oven, brush with butter mixture, then return to oven for another 5-6 minutes or until golden brown.

Tuesday, August 7, 2012

My 100th Blog Post & Oatmeal Chocolate Chip Cupcakes

Hello friends!

I still can't quite wrap my head around the idea that this is my 100th post on OnSugarMountain. It's been a little over a year since I started this baking blog, and it's taught me so much.

Some quick tidbits I've learned about baking:

1. Cupcakes are not always easy. Do not look down upon a cupcake. They can be quite awesome and take more work than you might imagine. See Banana Split Cupcakes & Homemade Hostess Cupcakes


2. Stuffing anything with nutella is an AWESOME idea and we should all try to do it as often as we can. See Nutella Stuffed Sugar Cookies & Nutella Stuffed Cupcakes


3 .Muffins are NOT just ugly cupcakes. Muffins can be sweet little mouthfuls of heaven without any frosting. See Strawberries & Cream Muffins


4. Eggless Cookie dough exists, can be eaten without getting sick, and is freaking fantastic. See Cookie Dough Topped Brownies


5. Baking can bring people together in ways that nothing else can. We can make friends, stuff our faces, and do it all while helping out those less fortunate than us.


On a larger scale and with the risk of sounding philosophical, this blog and all the adventures that accompany it led me to learn a great deal about myself. I know I said this blog was to document my adventures in baking until I opened up a bakery of my own, but I've realized something; the part I love the most about baking, eating, food, all of it, is the experience, and I could never turn it into a job that I'll eventually resent. Seeing people's faces light up when I bring in brownies to work, or hearing a collective "mmmm" as everyone takes a bite, I know I've brightened up their day, if only for a moment. I love that.

I love it so much that turning into something I will stress about is not an option. I could never risk turning baking into an activity I look at with exhausted eyes and think "I so do not want to bake today." Food, for me, will always be about the experience, about enjoying every single morsel of a meal and most importantly, sharing it with friends and family.


So opening my own bakery may not happen, but that doesn't mean I can't change the way we all have come to see food. How can I do this you ask? By doing exactly what I am doing right now. Blogging. Writing. Sharing. Doing. Food is such an intrical part of our lives but we've let it fall to the wayside in lieu of other "more important" things to stress about, such as our jobs, the economy etc etc. OR we stress about food too much and jump on every dietary bandwagon that rears its ugly head.

I want to remedy this. I want people to experience the love that can come from food. Our lives, now more than ever before, need balance. What better way to balance the stresses of our everyday lives than relaxing to come together around a table?

And so, drumroll please....

I'm starting a new blog this September!


On Sugar Mountain will still be up and running twice a week, but I hope that you will will come check out my new blog, The Foodie Files, where I hope to show people just how important food is to each and every one of us.

Phew. Lots of sharing going on in this post. Now it's finally time for the food!


Oatmeal Chocolate Chip Cupcakes. Make them. You'll love them. I promise. It's like a chewy oatmeal cookie, riddled with chocolate chips, baked into tiny cakes then covered with a mind-blowing cinnamon sugar frosting. Give one of these to a new acquaintance and I'm betting you two will be bffls in no time.

Lastly, I want to thank each and every one of you who read my blog. It makes my day to see comments posted about what I bake or a new follower pop up on my Dashboard. I've met wonderful people in creating this blog and I hope to meet so many more.

Until next time,

Happy Baking!


Oatmeal Chocolate Chip Cookies Via HowSweetEats

3/4 cup brown sugar, loosely packed
1 egg
1/2 cup butter, melted and cooled
2 tsp vanilla
1/2 cup oats
1 1/4 cup flour
1 1/4 tsp baking soda
1/4 tsp cinnamon
1/4 tsp salt
2 tbsp milk
1/2 cup chocolate chips tossed in a sprinkle of flour

1. Preheat oven to 350 degrees and line one 12-cup muffin pan with liners.
2. Beat egg and sugar until smooth, then beat in melted butter and vanilla.
3. Add oats, flour, baking soda, cinnamon and salt to egg mixture and stir until incorporated. Stir in milk then fold in chocolate chips.
4. Pour 1/4 cup of batter into cups then bake at 350 for 16-18 minutes or until tops spring back lightly when touched. Let cool in pan for 5 minutes before removing to wire rack to cool completely.

Cinnamon Sugar Chip Frosting

1 cup butter, softened
2 cups powdered sugar
1/2 cup brown sugar, loosely packed
1/4 tsp cinnamon
1 tbsp vanilla
1/3 cup chocolate chips
1 tbsp milk (optional)

1. Beat butter until light and creamy, then slowly beat in powdered sugar.
2. Add brown sugar, cinnamon and vanilla and beat until fluffy. Add milk if frosting is too thick.
3. Fold in chocolate chips.

Friday, August 3, 2012

DIY Vanilla Sugar Scrub

Hello friends,

If you love baking as much as I do, then you'll understand my need to bring it into every single part of my life. Baking, eating, and now smelling like a cupcake. Yes, you are still on the right blog. No, you did not misread the title. I plan on sharing with you the wonderful  secret I've learned thanks to sites like Pinterest.


You can make your own deliciously scented, economically awesome, body scrub. I have dropped at least $20-30 bucks on a precious jar of scrub from Sephora or Ulta, but no more! This recipe, including the glass mason jar I keep it in, comes in at roughly under $3 a batch.

Did I mention that you will have all of these ingredients already in the pantry? Oh and it's totally okay for sensitive skin. I break out even if the water is too hot in the shower, but this scrub leaves my skin baby soft and without a bump.


Here's our wonderful cast of characters: white sugar, brown sugar, vegetable oil, and vanilla extract. Feel free to splurge and pick up coconut oil or sunflower oil, but canola works just fine and does not have any unwanted smells, like olive oil. Also, you'll need the container you plan on storing the scrub in. I use a mason jar because I like the airtight seal and it's just super cute, but if you have kids or are afraid of shattered glass, just pick up a heavy duty tupperware container.


Fill your container with equal parts white and brown sugar, or as close as you can get. The great thing with this recipe is that it's pretty much adjustable to any kind of ingredients you have on hand. I even do all white sugar with fresh lemon zest for a to-die-for citrus scrub.


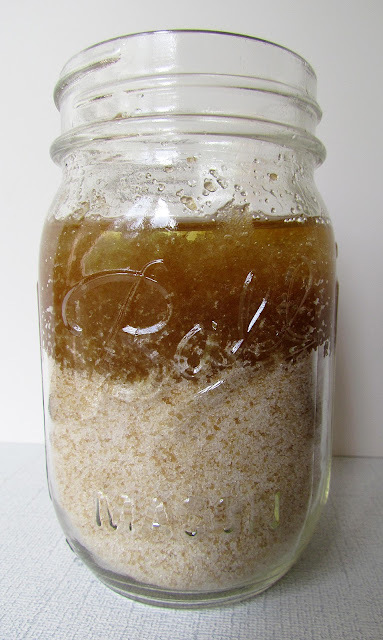
Pour out the sugars and mix them together until it looks like you have a bunch of beach sand. Pack the sugar back into your jar, then add about one tablespoon of vanilla extract and a few tablespoons of oil. Let the oil and extract seep into the sugar completely before adding any more oil. You want the oil to penetrate about 1/2 way down the sugar mixture.


Then turn it out one more time into a bowl and mix with your fingers until scrub comes together. When you wash your hands after this you will already begin to notice how awesome this scrub feels.


And that's it! Pack it back into your jar, screw on your lid and you're good to go. Want more scrub ideas? Here's some links with some great ideas for other scrubs that are great on your skin AND on your wallet.

DIY Citrus Salt Scrub
DIY Pumpkin Spice Sugar Scrub
DIY Beauty Tips (with Body Scrub Recipe)

And don't worry; I'll be back next week with a delicious cupcake I've been aching to try out from HowSweetEats.

Until then,

Happy scrubbing!